Generic retry loops

Now more than ever I’m finding that the systems I write are required to communicate with a whole host of other systems. With “cloud computing” becoming ever more popular this trend will no doubt continue. Two obvious examples are databases and web-services (either directly or through APIs). Systems that rely on other applications and end-points naturally have extra failure points that we need to consider. More often than not, when calls to external end-points fail the problems are transient. That is to say if we try the same operation a little later the call magically works. There are many reasons why we experience transient errors, with some examples being insufficient band-width, transmission errors or servers being too busy to respond in a timely fashion. Of course, the end-point could be permanently down so our code should handle this gracefully, but usually pausing and retrying usually solves the problem.

Implementing a retry loop isn’t a difficult task, but given a class that calls a number of different methods of the same remote end-point, we don’t want to duplicate the retry code for each call. Fortunately, a relatively new feature in .NET makes implementing generic retry loops much easier. Using our old friend the console application (and with the same disclaimer about client profiles as always) I’ve written a calculator class that we will be calling using a retry loop:

using System;

namespace RetryLoops
{
    public class Calculator
    {
        private readonly Random random;

        public Calculator()
        {
            unchecked
            {
                random = new Random((int)DateTime.Now.Ticks);
            }
        }

        public int Add(int x, int y)
        {
            var value = random.Next(0, 5);

            if (value == 0)
            {
                throw new InvalidOperationException("Transient error!");
            }

            return x + y;
        }

        public int Subtract(int x, int y)
        {
            var value = random.Next(0, 5);

            if (value == 0)
            {
                throw new InvalidOperationException("Transient error!");
            }

            return x - y;
        }
    }
}

Note that the Add and Subtract methods have a 1 in 5 chance of throwing an exception when they’re called. This is to simulate transient errors. Note also that I’m using the seeding technique for random numbers that I introduced in my last post.

I’ve coded the Program class as follows:

using System;

namespace RetryLoops
{
    public static class Program
    {
        public static void Main()
        {
            var calculator = new Calculator();

            Console.WriteLine(calculator.Add(1, 2));
            Console.WriteLine(calculator.Subtract(1, 2));
            Console.WriteLine(calculator.Add(1, 2));
            Console.WriteLine(calculator.Subtract(1, 2));
            Console.WriteLine(calculator.Add(1, 2));
            Console.WriteLine(calculator.Subtract(1, 2));
            Console.WriteLine(calculator.Add(1, 2));
            Console.WriteLine(calculator.Subtract(1, 2));
            Console.WriteLine(calculator.Add(1, 2));
            Console.WriteLine(calculator.Subtract(1, 2));
            Console.WriteLine(calculator.Add(1, 2));
            Console.WriteLine(calculator.Subtract(1, 2));

            Console.ReadLine();
        }
    }
}

You don’t need to run this very many times before you get an unhandled exception.

Adding a method called ExecuteOperationWithRetry to the program and changing the main method to use this gives:

using System;
using System.Threading;

namespace RetryLoops
{
    public static class Program
    {
        public static void Main()
        {
            var calculator = new Calculator();

            Console.WriteLine(ExecuteOperationWithRetry(() => calculator.Add(1, 2)));
            Console.WriteLine(ExecuteOperationWithRetry(() => calculator.Subtract(1, 2)));
            Console.WriteLine(ExecuteOperationWithRetry(() => calculator.Add(1, 2)));
            Console.WriteLine(ExecuteOperationWithRetry(() => calculator.Subtract(1, 2)));
            Console.WriteLine(ExecuteOperationWithRetry(() => calculator.Add(1, 2)));
            Console.WriteLine(ExecuteOperationWithRetry(() => calculator.Subtract(1, 2)));
            Console.WriteLine(ExecuteOperationWithRetry(() => calculator.Add(1, 2)));
            Console.WriteLine(ExecuteOperationWithRetry(() => calculator.Subtract(1, 2)));
            Console.WriteLine(ExecuteOperationWithRetry(() => calculator.Add(1, 2)));
            Console.WriteLine(ExecuteOperationWithRetry(() => calculator.Subtract(1, 2)));
            Console.WriteLine(ExecuteOperationWithRetry(() => calculator.Add(1, 2)));
            Console.WriteLine(ExecuteOperationWithRetry(() => calculator.Subtract(1, 2)));

            Console.ReadLine();
        }

        private static TReturn ExecuteOperationWithRetry<TReturn>(Func<TReturn> operation)
        {
            const int MaximumAttempts = 10;
            var timeBetweenRetries = TimeSpan.FromMilliseconds(100);

            var attempts = 0;
            
            while (true)
            {
                try
                {
                    attempts++;
                    return operation.Invoke();
                }
                catch (Exception exception)
                {
                    // If the exception isn't transient then re-throw:
                    if (!(exception is InvalidOperationException))
                    {
                        throw;
                    }

                    // If we've had all our attempts already then re-throw:
                    if (attempts >= MaximumAttempts)
                    {
                        throw;
                    }

                    // Wait before making another attempt:
                    Console.WriteLine("Transient error encountered, retrying...");
                    Thread.Sleep((int)(timeBetweenRetries.TotalMilliseconds * Math.Pow(2, attempts - 1)));
                }
            }
        }
    }
}

As the operation parameter of ExecuteOperationWithRetry is of type Func we can execute and retry any function we like without caring about the specific implementation of the function. In your own implementation you’ll probably want to get MaximumAttempts and timeBetweenRetries from a configuration file rather than hard-coding them, and you’ll probably also want to alter the exceptions that you retry on to suit the type of end-point. The Console.WriteLine statement in ExecuteOperationWithRetry is included only for demonstration purposes, and note that we are using the Math.Pow function to ensure that we wait a little longer each time we hit a transient error. This means that on the first attempt we wait for 100 milliseconds, then 200, 400, 800, 1600, etc… Once we’ve had 10 attempts we assume that the end-point is permanently broken and allow the exception to bubble up where (hopefully!) it’ll be caught by the calling method and handled appropriately.

When I ran this I got the following:

Retries 01

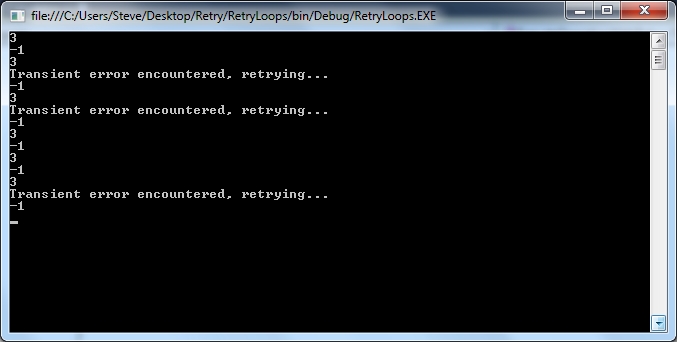
…which proves the retry loop is doing its job.

To make the code even more generic we can add the following overload of the ExecuteOperationWithRetry method, enabling us to handle operations that don’t have return values:

private static void ExecuteOperationWithRetry(Action operation)
{
    Func<bool> operationWithReturn = () => 
    {
        operation.Invoke();
        return true;
    };

    ExecuteOperationWithRetry(operationWithReturn);
}

There is a lot of scope to improve this technique, and to tailor it to specific applications. In fact, it is possible to make a totally generic retry loop component that has the exceptions to retry, time to pause and number of attempts to make passed in as constructor arguments. I’ll cover this in a future article, but for now, this concludes my exploration of retry loops.

Seeding the .NET random number generator

Occasionally I find myself generating random numbers/strings in C#. An example came up today where a SAML request token needed a unique ID consisting of 41 lowercase alphabet characters, which I generated using the Random class.

The constructor for this class has two overloads:

Random()
Random(int seed)

Apparently, computers don’t actually generate true random numbers but pseudo-random numbers as they are generated following a pattern. The starting point for the pattern is determined by a “seed”. The parameterless constructor uses a time-dependent seed, while the second constructor allows a user-defined seed. Most of the applications that I write involving random numbers use only one instance of the Random class, so I tend to use the following pattern when I instantiate it:

using System;

namespace RandomNumbers
{
    public static class Program
    {
        public static void Main()
        {
            Random random;
            unchecked
            {
                random = new Random((int)DateTime.Now.Ticks);
            }

            Console.WriteLine("Roll: {0}", random.Next(1, 7));
            Console.ReadLine();
        }
    }
}

The unchecked keyword ensures that we don’t get an overflow when we try and squeeze a 64-bit value into a 32-bit variable.

Registering many like types in Castle Windsor

Castle Windsor is an awesome dependency injection framework available for use with .NET. While a full explanation of dependency injection is beyond the scope of this post, two key reasons to use a dependency injection framework are:

1) Code using dependency injection is less “tightly-coupled” and thus less brittle.
2) Dependency injection is vital in order to achieve true test driven development (incorporating unit-testing and mocking).

Anyone familiar with Castle Windsor will know that individual types can be registered as follows:

container.Register(
                Component.For<IUserRepository>()
                .ImplementedBy(typeof(UserRepository))
                .LifeStyle.Transient);

However, it is often the case that we have many “like” classes in an application, all providing similar functionality and having a similar naming convention. A good example would be respository classes, particularly when using ORM frameworks. Rather than manually adding each repository to the dependency container, Castle Windsor has a neat shortcut for registering multiple classes:

container.Register(Classes.FromAssemblyContaining(typeof(UserRepository))
                .Where(type => type.Name.EndsWith("Repository"))
                .If(type => type.Namespace.StartsWith("MyApplication.Api.Data.Repositories"))
                .WithService.FromInterface(typeof(IRepository))
                .Configure(c => c.LifestyleTransient()));

The code above will find all classes implementing the interace IRepository in the namespace MyApplication.Api.Data.Repositories (and its children) that have Repository at the end of their name. These can then be accessed at runtime using:

var userRepository = injector.Resolve<IUserRepository>();
var productRepository = injector.Resolve<IProductRepository>();

Very cool!

Testing Windows Services

Windows Services should be part of any .NET developer’s arsenal as most enterprise solutions involve at least one Windows Service. Writing Windows Services is simple, and there are plenty of articles online to tell you how to do this. Testing Windows Services on the other hand, is a totally different story!

Of course, you could keep registering and running your service each time you make a change in order to test it, but this approach quickly becomes frustrating. A better technique that I use is to create a service wrapper console application project in the same solution as the service and run that each time I make a change. Here’s how…

Create a Windows Service. Your Solution Explorer should look a little something like this:

Testing Windows Services 1

Note that I’ve renamed Service1 to Service due to my OCD tendencies when it comes to naming conventions. I’ve created a simple test service with the following code in the Service.cs file:

using System.IO;
using System.ServiceProcess;

namespace MyService
{
    public partial class Service : ServiceBase
    {
        public Service()
        {
            InitializeComponent();
        }

        protected override void OnStart(string[] args)
        {
            using (var stream = new FileStream("Running", FileMode.Create, FileAccess.ReadWrite, FileShare.ReadWrite))
            {
                using (var writer = new StreamWriter(stream))
                {
                    writer.WriteLine("Running");
                    writer.Flush();
                }
            }
        }

        protected override void OnStop()
        {
            var fileInfo = new FileInfo("Running");
            if (fileInfo.Exists)
            {
                fileInfo.Delete();
            }
        }
    }
}

This just creates a file in the same directory as the service when the thing starts up, and deletes the file when it stops.

The service wrapper is just a console application, so add one of these to your solution. (Please note my post on the “.NET Framework 4 Client Profile” default setting for target framework when creating console applications as this may cause issues.) You will also need to reference your service project in the console application, along with a reference to System.ServiceProcess. The wrapper should then be set as the start up project:

Testing Windows Services 2

Add a class called ServiceWrapper to the console application as follows:

namespace MyService.Wrapper
{
    public class ServiceWrapper : Service
    {
        public void TestStart()
        {
            base.OnStart(new string[] { });
        }

        public void TestStop()
        {
            base.OnStop();
        }
    }
}

Notice that the wrapper inherits from my actual service, and exposes the OnStart and OnStop methods publically. This is a simple implementation of the facade pattern, and allows the console application to call service methods.

Then add the following code to the Program class in the console application:

using System;

namespace MyService.Wrapper
{
    public class Program
    {
        public static void Main(string[] args)
        {
            var serviceWrapper = new ServiceWrapper();

            try
            {
                serviceWrapper.TestStart();
                Console.ReadLine();
                serviceWrapper.TestStop();
            }
            catch (Exception exception)
            {
                Console.WriteLine("Error: " + exception.Message);
                Console.ReadLine();
            }
        }
    }
}

When the console application is run, the wrapper simulates the service starting up and then waits for a key press in the console window. The service will then execute as though it had been installed and ran. If you follow this example, you’ll see the file called “Running” appear and disappear. I recommend putting a breakpoint in the catch block of the Program class to help diagnose any issues you may encounter.

This approach can still be used if you use dependency injection, although you will need to manually inject any required dependencies into the service via the Program class in your wrapper. I’ll cover that in a future article.

Update: Note that if your Windows Service uses a .NET configuration file, you’ll need to share this with the console application. The best way to do this (to avoid duplicating settings between two configuration files) is to add the Windows Service configuration file to the console application as a link file. That way the console application will always use the Windows Service’s version of the file.

Console application pitfalls: .NET Framework 4 Client Profile

Console applications are extremely useful for testing out bits of code before you’re ready to start writing production code. For instance, I use them when getting to grips with new third party components. These applications are supposed to be throw away and so coding standards are not usually adhered to!

One thing I often forget is that by default, console applications start with the target framework set to “.NET Framework 4 Client Profile”, as in the following properties window screenshot:

.NET Framework 4 Client Profile

Symptoms of this include references missing from the references dialog box, methods not being available in Intellisense and code generally not behaving as expected. I’m not exactly sure why “.NET Framework 4 Client Profile” is available in the first place or why it’s so restrictive. I’ve also not bothered to research this, although I suspect it’s probably to allow code to run in environments with low security permissions. However, for throw away code or code that is never going to leave your infrastructure I’d advise getting into the habit of changing the target framework to “.NET Framework 4” each time you make a new console application, otherwise you’re likely to end up scratching your end when simple stuff doesn’t work as expected.

Monitoring website up-time

Most web-hosting firms specify the level of “up-time” you can expect to get on your website. Typically this is given as a percentage (e.g. 99.99%, 99.999%, etc…), but how do you know if they’re really telling the truth? After all, you can’t measure this yourself.

I currently use Pingdom to measure up time for my sites. Pingdom constantly monitors websites and produces a monthly report stating the uptime. It also emails me to tell me each time my site does not respond for a period of time (i.e. it is down), and when it comes back up again. The basic package is totally free and perfectly adequate if all you want is to receive up-time statistics and site-down alerts.

WordPress and Google Analytics

Following on from my last post in which I describe how to include code snippets in WordPress posts, I also decided it would also be great to track visitors to my blog using Google Analytics. Fortunately, this was very easy to set up.

The first step is to create a Google Analytics account. This is easy and fully explained by Google so I won’t go into details here. Once you have created your account you should be able to see your tracking code, which for me looks like this:

<script type="text/javascript">// <![CDATA[

  var _gaq = _gaq || [];
  _gaq.push(['_setAccount', 'UA-39305296-1']);
  _gaq.push(['_trackPageview']);

  (function() {
    var ga = document.createElement('script'); ga.type = 'text/javascript'; ga.async = true;
    ga.src = ('https:' == document.location.protocol ? 'https://ssl' : 'http://www') + '.google-analytics.com/ga.js';
    var s = document.getElementsByTagName('script')[0]; s.parentNode.insertBefore(ga, s);
  })();

// ]]></script>

To monitor your WordPress site using Google Analytics you simply need to open the editor under the ‘Appearance’ menu, select Footer (footer.php) and paste the entire tracking code block just before the closing body tag:

</body>

Once done, Google Analytics will monitor traffic to your site.

Addendum: Warning! Updating your WordPress theme will overwrite any customisations you have made to the files. So, if you run a WordPress auto-update, be prepared to have to re-paste the Google Analytics code in again.

Including code snippets in WordPress using Sunburst Code Prettify

I realised that if this blog is going to be effective I’m going to need to show code snippets in my posts. This is obviously something that WordPress doesn’t do out of the box. I experimented with a few options before settling on the Sunburst Code Prettify plugin. Unlike other alternatives that I tried, this plugin worked straight away with no extra configuration needed.

However, there was one annoying issue. When I entered the text below into a new post:

Prettify 1

…it rendered as:

Prettify 2

Notice that the quotes have been scrambled. A few minutes on Google later and I’d found the following great article that explained what was going on:

WordPress Stop Changing My Quotes

The solution for me was to add the following line of code to my “Theme Functions (functions.php)” file in the WordPress editor, right at the end of the file:

remove_filter(‘the_content’, ‘wptexturize’);

Doing this fixed the issue and my code renders correctly as follows:

using System;

namespace HelloWorld
{
    public static class Program
    {
        public static void Main(string[] args)
        {
            Console.WriteLine("Hello World");
            Console.ReadLine();
        }
    }
}

Update (3rd September 2013)
Having seen Scott Miller’s blog and had some great advice from him via email, I have since switched to using ‘pre’ tags to render my code snippets, so this article is now out of date. The ‘pre’ approach is simpler and results in cleaner looking cope snippets. Another benefit is that I haven’t found any character issues yet, although code containing tags (e.g. HTML and XML) does have to be encoded before it can be encased in the ‘pre’ tags.