Exotic .NET XML configuration file sections

The .NET framework makes application configuration really simple by supplying an out-of-the-box XML configuration file structure and associated classes to access the information contained within it.

By default, it allows configuration key-value pairs to be set and retrieved easily at run time. For example, the following configuration settings:

  <appSettings>
    <add key="ServerName" value="WinDB1"/>
    <add key="DatabaseName" value="MyData"/>
    <add key="EnableFeature" value="true"/>
  </appSettings>

…can be retrieved using:

var appSettingsReader = new AppSettingsReader();

var serverName = (string)appSettingsReader.GetValue("ServerName", typeof(string));
var databaseName = (string)appSettingsReader.GetValue("DatabaseName", typeof(string));
var enableFeature = (bool)appSettingsReader.GetValue("EnableFeature", typeof(bool));

…or (if you add a reference to System.Configuration):

var serverName = ConfigurationManager.AppSettings["ServerName"];
var databaseName = ConfigurationManager.AppSettings["DatabaseName"];
var enableFeature = bool.Parse(ConfigurationManager.AppSettings["EnableFeature"]);

…although as per a past post of mine, Encapsulated and strongly-typed access to .NET configuration files I don’t recommend that you litter your code with references to AppSettingsReader (or ConfigurationManager), but instead that you wrap all configuration up in a class so that settings are encapsulated away.

It is often necessary to hold more complex configurations though. Many developers I’ve worked with have tried to use the key-value model to store such settings, using a single string with various delimiters to hold separate different values. For instance, given a person construct with an ID, title, first name, last name and birth date attributes, some developers would be tempted to do something like this:

  <appSettings>
    <add key="Person1" value="I:1|T:Mr|F:Joe|L:Bloggs|D:1980-01-01"/>
  </appSettings>

…and then use string split functions to populate a Person class when reading information from the configuration file. While this approach works, it results in brittle, hard to read configuration files and complex string logic to take strings apart.

Instead, it is better to use the exotic configuration capabilities included in the framework. Here is an example demonstrating how you might store configuration information to populate the following Person class:

using System;

namespace ConfigurationExample
{
    public class Person
    {
        public int Id { get; set; }
        public string Title { get; set; }
        public string FirstName { get; set; }
        public string LastName { get; set; }
        public DateTime BirthDate { get; set; }
    }
}

The configuration file to store such settings might look like this:

<?xml version="1.0" encoding="utf-8" ?>
<configuration>
  
  <configSections>
    <section name="people" type="ConfigurationExample.PeopleConfigurationSectionHandler, ConfigurationExample" />
  </configSections>
  
  <people>
    
    <person id="1">
      <title>Mr</title>
      <firstName>Joe</firstName>
      <lastName>Bloggs</lastName>
      <birthDate>
        <year>1980</year>
        <month>1</month>
        <day>1</day>
      </birthDate>
    </person>

    <person id="2">
      <title>Miss</title>
      <firstName>Jane</firstName>
      <lastName>Black</lastName>
      <birthDate>
        <year>1984</year>
        <month>2</month>
        <day>3</day>
      </birthDate>
    </person>
    
  </people>
  
</configuration>

A class implementing IConfigurationSectionHandler must be written to read this exotic configuration file structure; you will need a reference to System.Configuration in order to use this interface. The location of your class is given in the ‘configSections’ declaration at the top of the file. In this case the framework is being instructed to look for a class with name and namespace ‘ConfigurationExample.PeopleConfigurationSectionHandler’ in the ‘ConfigurationExample’ DLL/project in order to read the configuration section named ‘people’.

That class could look something like this:

using System;
using System.Collections.Generic;
using System.Configuration;
using System.Xml;

namespace ConfigurationExample
{
    public class PeopleConfigurationSectionHandler : IConfigurationSectionHandler
    {
        public object Create(object parent, object configContext, XmlNode section)
        {
            var people = new List<Person>();

            foreach (XmlNode node in section.ChildNodes)
            {
                if (node.NodeType == XmlNodeType.Comment)
                {
                    continue;
                }

                var id = GetAttributeInt(node, "id");
                var title = GetChildNodeString(node, "title");
                var firstName = GetChildNodeString(node, "firstName");
                var lastName = GetChildNodeString(node, "lastName");

                var birthDateNode = GetChildNode(node, "birthDate");

                var birthDateYear = GetChildNodeInt(birthDateNode, "year");
                var birthDateMonth = GetChildNodeInt(birthDateNode, "month");
                var birthDateDay = GetChildNodeInt(birthDateNode, "day");

                people.Add(new Person
                {
                    Id = id,
                    Title = title,
                    FirstName = firstName,
                    LastName = lastName,
                    BirthDate = new DateTime(birthDateYear, birthDateMonth, birthDateDay),
                });
            }

            return people;
        }

        private static string GetAttributeString(XmlNode node, string attributeName)
        {
            try
            {
                return node.Attributes[attributeName].Value;
            }
            catch
            {
                var message = string.Format("Could not read attribute named '{0}' in people section of configuration file", attributeName);
                throw new ConfigurationErrorsException(message);
            }
        }

        private static int GetAttributeInt(XmlNode node, string attributeName)
        {
            try
            {
                var value = GetAttributeString(node, attributeName);
                return int.Parse(value);
            }
            catch
            {
                var message = string.Format("Could not convert value stored in attribute named '{0}' to an integer", attributeName);
                throw new ConfigurationErrorsException(message);
            }
        }

        private static XmlNode GetChildNode(XmlNode parentNode, string nodeName)
        {
            try
            {
                return parentNode[nodeName];
            }
            catch
            {
                var message = string.Format("Could not find node named '{0}' in people section of configuration file", nodeName);
                throw new ConfigurationErrorsException(message);
            }
        }

        private static string GetChildNodeString(XmlNode parentNode, string nodeName)
        {
            try
            {
                return parentNode[nodeName].InnerText;
            }
            catch
            {
                var message = string.Format("Could not read node named '{0}' in people section of configuration file", nodeName);
                throw new ConfigurationErrorsException(message);
            }
        }

        private static int GetChildNodeInt(XmlNode parentNode, string nodeName)
        {
            try
            {
                var value = GetChildNodeString(parentNode, nodeName);
                return int.Parse(value);
            }
            catch
            {
                var message = string.Format("Could not convert value stored in node named '{0}' to an integer", nodeName);
                throw new ConfigurationErrorsException(message);
            }
        }
    }
}

Although there is quite a lot of code there, it’s all pretty simple. More importantly, it’s not too brittle and very simple to extend should you wish to add more attributes to the Person class.

The method required by the IConfigurationSectionHandler interface is Create:

public object Create(object parent, object configContext, XmlNode section)

This is what gets called when the framework asks for the contents of the ‘people’ section. The ‘section’ parameter contains the people node from the XML. In essence, the code creates a list in which Person objects are stored, and loops over the child nodes in order to extract the correct information.

There are two important points to note about the code:

1) The code that detects for the presence of XML comments:

if (node.NodeType == XmlNodeType.Comment)
{
    continue;
}

…ensures that developers don’t break the code by adding comments into the XML.

2) All the helper methods in the class (e.g. GetAttributeString, GetChildNodeString, etc…) must expect there to be issues with the XML and throw meaningful, self-explanatory exceptions when things do go wrong. When there are problems with these types of sections it is not always obvious what the problem is from the default exceptions .NET throws (particularly if you’re using this technique in the start up code of a Windows Service) so you will save yourself a lot of head scratching further down the line by writing good error messages. The chances are that you will have more than one section handler in your project so it’s a good idea to encapsulate such helper methods away in an abstract ConfigurationSectionHandler base class to cut down on duplication and to promote reuse.

Assuming you have registered your section handlers correctly in the ‘configSections’ declaration, you can retrieve the Person objects as follows:

var people = (IList<Person>)ConfigurationManager.GetSection("people");

Since the IConfigurationSectionHandler interface uses the ‘object’ type as its return value you need to cast the result to the correct type. It would have been nice if the interface was made generic, but I guess you can’t have everything!

If you’re following the advice in my previous post on configuration encapsulation, you’ll probably want to wrap this call up in your ConfigurationFile class, as follows:

using System.Collections.Generic;
using System.Configuration;

namespace ConfigurationExample
{
    public class ConfigurationFile
    {
        private readonly IList<Person> people;

        public ConfigurationFile()
        {
            people = (IList<Person>)ConfigurationManager.GetSection("people");
        }

        public IList<Person> People
        {
            get
            {
                return people;
            }
        }
    }
}

Note that a reference to the Person list is stored when the class constructs to save the running the cast each time you want to retrieve the contents of the configuration file section.

In summary, it’s a little more work to write exotic configuration file sections, but the advantages over brittle, difficult to extend key-value implementations is certainly worth the extra effort.

Basic Log4Net step-up

The following post explains how to get Log4Net working in a .NET console application.

The first step is create your console application and add references to Log4Net. The easiest way to add the correct references is via NuGet, where it is simply listed as log4net.

You’ll need to add a configuration file to tell Log4Net how you want it to log. A basic example would be:

<?xml version="1.0" encoding="utf-8" ?>
<configuration>
  
  <configSections>
    <section name="log4net" type="log4net.Config.Log4NetConfigurationSectionHandler,log4net" />
  </configSections>

  <log4net>
    <appender name="RollingFile" type="log4net.Appender.RollingFileAppender">
      <file value="Test.log" />
      <appendToFile value="true" />
      <maximumFileSize value="5000KB" />
      <maxSizeRollBackups value="50" />
      <layout type="log4net.Layout.PatternLayout">
        <conversionPattern value="%utcdate{yyyy-MM-dd HH:mm:ss.fffffff} - %level - %logger - %message%newline" />
      </layout>
    </appender>
    <root>
      <level value="DEBUG" />
      <appender-ref ref="RollingFile" />
    </root>
  </log4net>
  
</configuration>

This example simply adds a rolling log file. It’s called rolling because it starts a new log file at triggered intervals, allowing you to delete historical log files when you’ve finished with them. In this case, a new log file is started each time the current log file gets to 5000KB. It’s worth taking a look at the Log4Net documentation to find out about the different types of logging available. It is also possible to write your own appender if you want to do something not already built it to Log4Net.

In order to tell Log4Net to pick your configuration, you need to add the following to your application:

[assembly: XmlConfigurator]

The most obvious place for this is the AssemblyInfo.cs file.

This tells Log4Net to look in the default configuration file for the Log4Net configuration settings, but you can also tell Log4Net to look in another custom configuration file using the overloads available to the XmlConfigurator, although I prefer to keep all configuration in a single file.

Then it’s just a case of using the logger:

using System;
using log4net;

namespace Test
{
    public static class Program
    {
        public static void Main()
        {
            var log = LogManager.GetLogger(typeof(Program));
            log.Debug("Test console application started");

            Console.ReadLine();
        }
    }
}

Note that the LogManager returns an object implementing the ILog interface.

If you’re using dependency injection, you should wire up the dependency injector to return your ILog instance. The following shows how to do this if you’re using Castle Windsor:

using Castle.MicroKernel.Registration;
using Castle.Windsor;
using Castle.Windsor.Installer;
using log4net;

namespace Test
{
    public static class Injector
    {
        private static readonly object InstanceLock = new object();

        private static IWindsorContainer instance;

        public static IWindsorContainer Instance
        {
            get
            {
                lock (InstanceLock)
                {
                    return instance ?? (instance = GetInjector());
                }
            }
        }

        private static IWindsorContainer GetInjector()
        {
            var container = new WindsorContainer();

            container.Install(FromAssembly.This());

            RegisterInjector(container);
            RegisterLog(container);

            return container;
        }

        private static void RegisterInjector(WindsorContainer container)
        {
            container.Register(
                Component.For<IWindsorContainer>()
                    .Instance(container));
        }

        private static void RegisterLog(WindsorContainer container)
        {
            container.Register(
                Component.For<ILog>()
                    .Instance(LogManager.GetLogger(typeof(Injector)))
                    .LifestyleSingleton());
        }
    }
}

The following statement will return an ILog instance as expected:

var log = Injector.Instance.Resolve();

There you have it!

Testing Windows Services with dependency injection

Last year I wrote a post on Testing Windows Services. I pointed out that recompiling and installing your Windows Service following each change is a really inefficient way to develop and test a service. Instead, I suggest that you can run and debug your service in Visual Studio simply by wrapping the service up in a test console application.

I said that I would revisit the post for services using dependency injection, so here goes. Note that the code in this article follows on directly from the code in the previous article, so you’ll need to read the previous article in order for this to make sense!

First, a quick discussion as to how you could add dependency injection to a Windows Service:

I believe the easiest way to use dependency injection in a .NET Windows Service application is to use the dependency injection engine to inject required services into the ServiceBase.Run() method in the Program class for the service:

using System.ServiceProcess;

namespace MyService
{
    public static class Program
    {
        public static void Main()
        {
            var servicesToRun = new[] { (ServiceBase)Injector.Instance.Resolve() };
            ServiceBase.Run(servicesToRun);
        }
    }
}

In order to do this, you simply need to create an empty interface for your service, which the service implements:

namespace MyService
{
    public interface IService
    {
        // No implementation
    }
}
using System.IO;
using System.ServiceProcess;

namespace MyService
{
    public partial class Service : ServiceBase, IService
    {
        public Service()
        {
            InitializeComponent();
        }

        // Service implementation...
    }
}

My original article gave an example of a service which creates and deletes a file when it starts and stops. To complete the example, let’s extract the file interaction code out as a dependency. Here’s the interface:

namespace MyService
{
    public interface IFileCreator
    {
        void Create();
        void Delete();
    }
}

…and here’s the implementation:

using System.IO;

namespace MyService
{
    public class FileCreator : IFileCreator
    {
        public void Create()
        {
            using (var stream = new FileStream("Running", FileMode.Create, FileAccess.ReadWrite, FileShare.ReadWrite))
            {
                using (var writer = new StreamWriter(stream))
                {
                    writer.WriteLine("Running");
                    writer.Flush();
                }
            }
        }

        public void Delete()
        {
            var fileInfo = new FileInfo("Running");
            if (fileInfo.Exists)
            {
                fileInfo.Delete();
            }
        }
    }
}

The injector class for the service would then look something like this:

using Castle.MicroKernel.Registration;
using Castle.Windsor;
using Castle.Windsor.Installer;

namespace MyService
{
    public static class Injector
    {
        private static readonly object InstanceLock = new object();

        private static IWindsorContainer instance;

        public static IWindsorContainer Instance
        {
            get
            {
                lock (InstanceLock)
                {
                    return instance ?? (instance = GetInjector());
                }
            }
        }

        private static IWindsorContainer GetInjector()
        {
            var container = new WindsorContainer();

            container.Install(FromAssembly.This());

            RegisterInjector(container);
            RegisterService(container);
            RegisterFileCreator(container);

            return container;
        }

        private static void RegisterInjector(WindsorContainer container)
        {
            container.Register(
                Component.For()
                .Instance(container));
        }

        private static void RegisterService(WindsorContainer container)
        {
            container.Register(
                Component.For()
                    .ImplementedBy(typeof(Service)));
        }

        private static void RegisterFileCreator(WindsorContainer container)
        {
            container.Register(
                Component.For()
                    .ImplementedBy(typeof(FileCreator)));
        }
    }
}

Note that I’ve wired up both the service (using IService) and my new FileCreator class.

The ServiceWrapper class would be exactly as in the previous example. The only change to the wrapper console application would be to change the Program, as follows:

using System;
using MyService;

namespace MyServiceWrapper
{
    public class Program
    {
        public static void Main(string[] args)
        {
            var serviceWrapper = new ServiceWrapper();

            // Wire up service dependencies here:
            serviceWrapper.FileCreator = Injector.Instance.Resolve();

            try
            {
                serviceWrapper.TestStart();
                Console.ReadLine();
                serviceWrapper.TestStop();
            }
            catch (Exception exception)
            {
                Console.WriteLine("Error: " + exception.Message);
                Console.ReadLine();
            }
        }
    }
}

Unfortunately, in this class I’ve had to wire up all the dependencies in the ServiceWrapper manually as I haven’t found a way to do this automatically. However, this one small pain point is a significant improvement compared to compiling and installing your service each time you make a change!

Testing Windows Services

Windows Services should be part of any .NET developer’s arsenal as most enterprise solutions involve at least one Windows Service. Writing Windows Services is simple, and there are plenty of articles online to tell you how to do this. Testing Windows Services on the other hand, is a totally different story!

Of course, you could keep registering and running your service each time you make a change in order to test it, but this approach quickly becomes frustrating. A better technique that I use is to create a service wrapper console application project in the same solution as the service and run that each time I make a change. Here’s how…

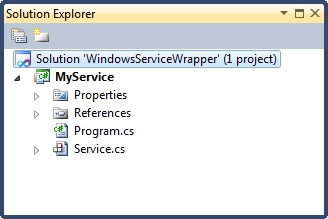
Create a Windows Service. Your Solution Explorer should look a little something like this:

Testing Windows Services 1

Note that I’ve renamed Service1 to Service due to my OCD tendencies when it comes to naming conventions. I’ve created a simple test service with the following code in the Service.cs file:

using System.IO;
using System.ServiceProcess;

namespace MyService
{
    public partial class Service : ServiceBase
    {
        public Service()
        {
            InitializeComponent();
        }

        protected override void OnStart(string[] args)
        {
            using (var stream = new FileStream("Running", FileMode.Create, FileAccess.ReadWrite, FileShare.ReadWrite))
            {
                using (var writer = new StreamWriter(stream))
                {
                    writer.WriteLine("Running");
                    writer.Flush();
                }
            }
        }

        protected override void OnStop()
        {
            var fileInfo = new FileInfo("Running");
            if (fileInfo.Exists)
            {
                fileInfo.Delete();
            }
        }
    }
}

This just creates a file in the same directory as the service when the thing starts up, and deletes the file when it stops.

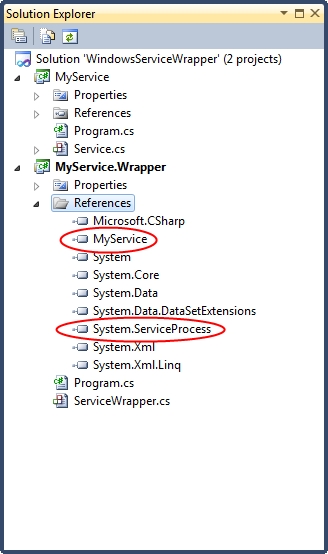
The service wrapper is just a console application, so add one of these to your solution. (Please note my post on the “.NET Framework 4 Client Profile” default setting for target framework when creating console applications as this may cause issues.) You will also need to reference your service project in the console application, along with a reference to System.ServiceProcess. The wrapper should then be set as the start up project:

Testing Windows Services 2

Add a class called ServiceWrapper to the console application as follows:

namespace MyService.Wrapper
{
    public class ServiceWrapper : Service
    {
        public void TestStart()
        {
            base.OnStart(new string[] { });
        }

        public void TestStop()
        {
            base.OnStop();
        }
    }
}

Notice that the wrapper inherits from my actual service, and exposes the OnStart and OnStop methods publically. This is a simple implementation of the facade pattern, and allows the console application to call service methods.

Then add the following code to the Program class in the console application:

using System;

namespace MyService.Wrapper
{
    public class Program
    {
        public static void Main(string[] args)
        {
            var serviceWrapper = new ServiceWrapper();

            try
            {
                serviceWrapper.TestStart();
                Console.ReadLine();
                serviceWrapper.TestStop();
            }
            catch (Exception exception)
            {
                Console.WriteLine("Error: " + exception.Message);
                Console.ReadLine();
            }
        }
    }
}

When the console application is run, the wrapper simulates the service starting up and then waits for a key press in the console window. The service will then execute as though it had been installed and ran. If you follow this example, you’ll see the file called “Running” appear and disappear. I recommend putting a breakpoint in the catch block of the Program class to help diagnose any issues you may encounter.

This approach can still be used if you use dependency injection, although you will need to manually inject any required dependencies into the service via the Program class in your wrapper. I’ll cover that in a future article.

Update: Note that if your Windows Service uses a .NET configuration file, you’ll need to share this with the console application. The best way to do this (to avoid duplicating settings between two configuration files) is to add the Windows Service configuration file to the console application as a link file. That way the console application will always use the Windows Service’s version of the file.

Console application pitfalls: .NET Framework 4 Client Profile

Console applications are extremely useful for testing out bits of code before you’re ready to start writing production code. For instance, I use them when getting to grips with new third party components. These applications are supposed to be throw away and so coding standards are not usually adhered to!

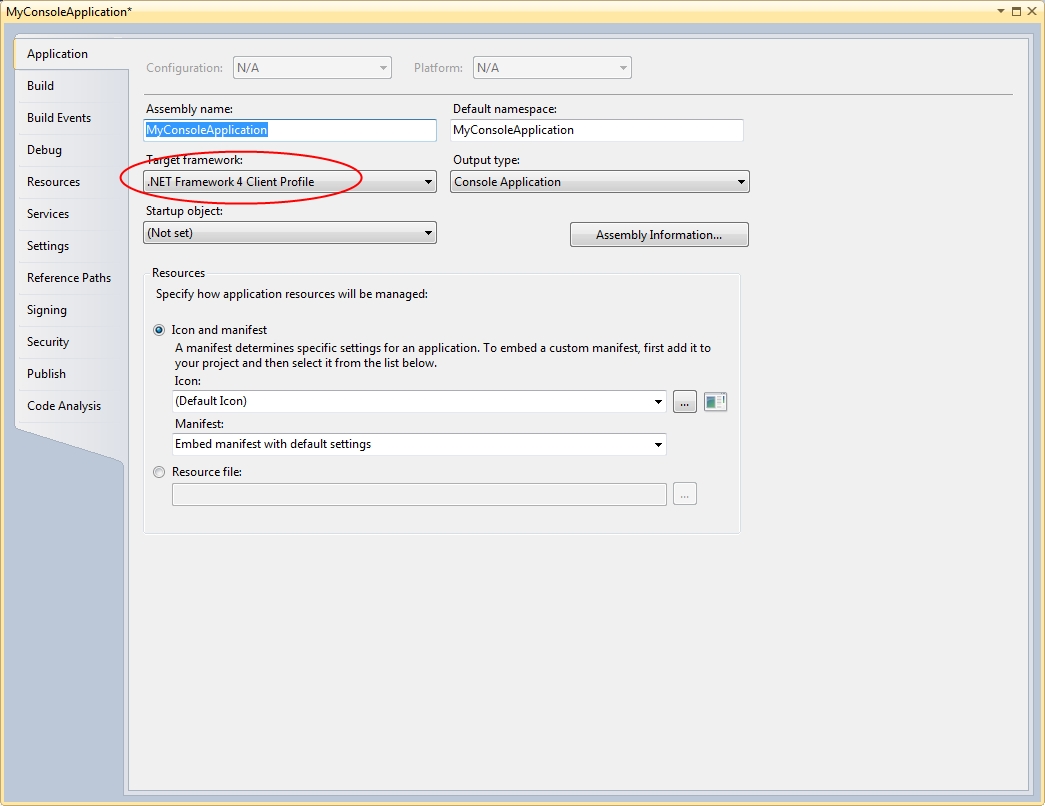
One thing I often forget is that by default, console applications start with the target framework set to “.NET Framework 4 Client Profile”, as in the following properties window screenshot:

.NET Framework 4 Client Profile

Symptoms of this include references missing from the references dialog box, methods not being available in Intellisense and code generally not behaving as expected. I’m not exactly sure why “.NET Framework 4 Client Profile” is available in the first place or why it’s so restrictive. I’ve also not bothered to research this, although I suspect it’s probably to allow code to run in environments with low security permissions. However, for throw away code or code that is never going to leave your infrastructure I’d advise getting into the habit of changing the target framework to “.NET Framework 4” each time you make a new console application, otherwise you’re likely to end up scratching your end when simple stuff doesn’t work as expected.