Simple trick to help prevent click-jacking

Click-jacking is a technique used by hackers to get you to interact with websites without your consent or knowledge. An example would be to get you to click a Like button on a Facebook page without you realising it. The trick with click-jacking is misdirection. One way to achieve this is to show you a friendly looking site, preferably a site which you are already familiar with, but where the buttons perform actions other than those you expect. This can be achieved by hosting the friendly site in an iframe, with fake buttons floated over the top of the real buttons. These fake buttons can then perform unintended actions, such as submitting a Like to Facebook.

You can test whether your website is vulnerable using the following HTML snippet:

<html>
<head>
<title>Clickjack test page</title>
</head>
<body>
<p>Website is vulnerable to clickjacking!</p>
<iframe src="http://www.mywebsite.com" width="1000" height="1000"></iframe>
</body>
</html>

If you can see the text Website is vulnerable to clickjacking! when you look at the code in a browser your site could be used as a target for click-jacking.

A simple way to prevent this kind of attack is to include the following JavaScript at the top of your site:

<script type="text/javascript">
// Prevent the page from being vulnerable to click jacking
if (self == top) {
var theBody = document.getElementsByTagName('body')[0];
theBody.style.display = "block";
} else {
top.location = self.location;
}
</script>

The JavaScript checks to see if the containing page is the top-most entity in the HTML served to the user. If not, then the whole browser is re-directed to the address of the containing page, thus removing the iframe.

Obviously this won’t work if users don’t have JavaScript enabled, but for the sake of a few lines of trivial JavaScript it’s worth adding this to your site.


Ignore SSL errors when calling web-services in C#

Often when developing .NET systems that call secure web-services, I find myself running code against development and test servers with invalid SSL certificates. This causes service calls to fail and prevents me from making progress. To get round this potential blocker, I include the following snippet somewhere in the code before the service call is made:

ServicePointManager.ServerCertificateValidationCallback = delegate { return true; };

This code only needs to appear once, and it is not good practice to leave it in production code as it means that data sent over HTTPS isn’t actually secure. Consider making the inclusion of this code configurable, or wrap it up in #DEBUG statements so that it is not compiled into production code.

Geeky Google Analytics

Google Analytics is awesome, there is no doubt about it. It’s easy to integrate into websites and the UI to get metrics information out of is pretty cool too, especially the real time stuff which now seems to work better than ever. However, when I’m asked particularly complex metrics-based questions by guys I develop sites for I often find it difficult to get exactly the information I need from the standard Google Analytics UI.

Instead, I find the Google Analytics Query Explorer 2 tool useful. It’s not pretty, but it allows me to build up complex analytics queries in a single screen without having to search around for filters and options. It feels more like writing SQL against Google’s Analytics store rather than battling with the standard UI they wrap around the numbers. I wouldn’t be surprised if the default UI uses the Query Explorer behind the scenes to get at the numbers either.

Enjoy!

Enabling developer options on Samsung Galaxy S4

Although it won’t be useful to most standard users, here’s how to enable Developer Options on your Samsung Galaxy S4:

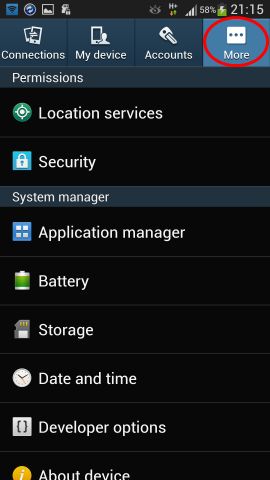
Open the Settings menu. This is available by dragging down the menu at the top of the screen and clicking on the settings cog:

S4 Developer Options 1

Click on More at the top right of the screen:

S4 Developer Options 2

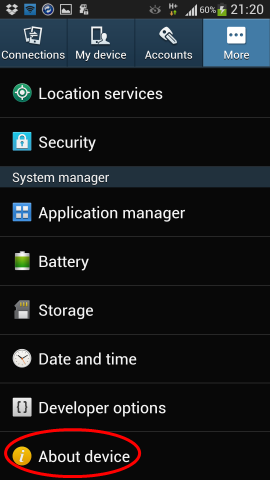
Then click About device:

S4 Developer Options 3

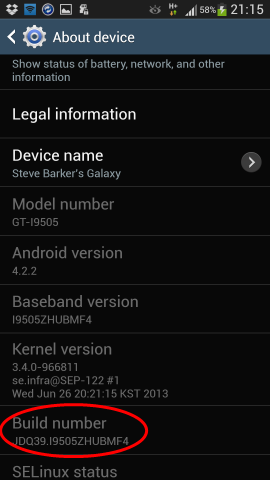
Then press the entry for Build number a number of times:

S4 Developer Options 4

A message will tell you that you are touching the right area. A countdown is also included so you know how many presses you need to make. You should get a success message when it’s worked.

This then activates a new menu labelled Developer options, which you can see is already activated on my phone in the screenshots above.

The most useful feature in this new menu for me is USB debugging, which is required by some apps, including MyPhoneExplorer.

Aside: My Phone Explorer is an awesome free piece of software which I use to connect my phone to my computer. With this software I can send texts from my computer, keep a back up of all my messages and perform various sync-tasks. I find that it works better than the Kies software that comes with the phone as standard.

Taking screenshots on Samsung Galaxy S4

It is sometimes useful to be able to take screenshots of what’s happening on your phone, particularly if you’re a developer/tester doing some work on mobiles. It’s also useful if you’re blogging about phones and want to include some screenshots, as I did in my last post on killing unused apps. On the Samsung Galaxy S4 you can take screenshots by holding down the power button and home key together until the screen flashes. If you’ve got the sound on, you’ll also hear a camera shutter sound.

An especially useful trick is to use the Dropbox app and configure it to sync images taken on the phone. If you do this, your screenshot will appear in the Dropbox on your local machine within seconds, assuming you’re on a good internet connection.

Killing apps on Samsung Galaxy S4

Now that I’m the (proud) owner of a Samsung Galaxy S4 I’ll blog about any cool features and tricks I pick up for this phone. As the Galaxy S4 runs on Android any such tips will probably work on other Android phones as well, although the buttons used will probably differ between different makes of phones.

First up, there’s a neat way to kill open apps that are running in the background. Killing unused apps could potentially save battery usage, and so is worth doing if you’re trying conserve power. To access this feature, first “long press” the Home key. On the screen that opens, click on the button at the bottom left hand corner of the screen showing a pie-chart:

S4 Kill Apps

Click the Applications button at the top left hand corner of the screen:

S4 Kill Apps 2

…end click End next to any applications you want to close. Simple!

Allowing Castle Windsor to resolve two interfaces to the same instance

There are times when it’s useful to be able to resolve two different interfaces to the same type when using Castle Windsor for dependency injection. Given a class called MyClass which implements two interfaces, IOne and ITwo, the following code will achieve this:

container.Register(
                Component.For<IOne, ITwo>()
                .ImplementedBy(typeof(MyClass))
                .LifeStyle.Singleton);

This can be simply demonstrated using the following classes:

namespace TwoInterfaces
{
    public interface IOne
    {
        string GetMessage();
    }

    public interface ITwo
    {
        string GetMessage();
    }

    public class MyClass : IOne, ITwo
    {
        public string GetMessage()
        {
            return "Hello World!";
        }
    }
}

…in a console application. Running the following program class:

using System;

namespace TwoInterfaces
{
    public static class Program
    {
        public static void Main(string[] args)
        {
            var injector = Injector.Instance;

            var one = injector.Resolve<IOne>();
            var two = injector.Resolve<ITwo>();

            Console.WriteLine(one.GetMessage());
            Console.WriteLine(two.GetMessage());
            Console.WriteLine(one.Equals(two));

            Console.WriteLine("Press RETURN to exit...");
            Console.ReadLine();
        }
    }
}

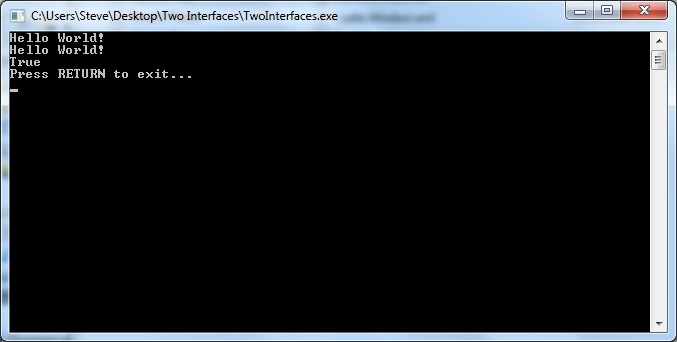
…yields:

CastleWindsorTwoInterfaces

…as expected. My post entitled Basic dependency injection with Castle Windsor explains how to set up a fully working Castle Windsor injector in more detail.

Deleting old IIS logs

The other week a business I was working with experienced “a perfect storm”. A production web-server ran out of disk space due to the build-up of IIS logs. Normally the standard monitoring tools used by the organisation would have picked this up, but it turns out they hadn’t been configured properly and so the alerts were being emailed to the wrong team! After various “it shouldn’t have been possible” conference calls, we decided to automate the deletion of log files for IIS (and for another system) after seven days. I figured this functionality would be offered out of the box by IIS. I was wrong!

Instead, I found this awesome post on Stack Overflow that answered the question using the forfiles command.

I create a daily schedule containing the following command to delete IIS logs:

forfiles /p "C:\inetpub\logs\LogFiles" /s /m "*.*" /c "cmd /c Del @path" /d -7

…and this to delete my other log files:

forfiles /p "C:\application_name\logs\" /m "application_name.log*.log" /c "cmd /c Del @path" /d -7

Note that I dropped the /s in the second command because I know that my application logs are all in a specific folder, and the file name pattern I’m using matches roll-over files created by log4net.

This works like a dream.

JavaScript find and replace all

I was doing some string manipulation the other day using JavaScript. The following code demonstrates the sort of operation I was attempting:

<script type="text/javascript">
    var text = "1234321234321";
    text = text.replace("1", "X");
    alert(text);
</script>

I was expecting the output to be X23432X23432X, but instead got X234321234321. I didn’t realise that the replace method only works on the first instance of the text to be replaced that it finds! I wanted to avoid looping to remove all instances, and instead found this rather nice example on the web that uses regular expressions to replace all instances:

<script type="text/javascript">
    var text = "1234321234321";
    text = text.replace(/1/g, 'X'); 
    alert(text);
</script>

This gives the desired result.

Exception extension method to show full exception details

While I think the exception model in .NET is very good, there are two aspects which can make diagnosing issues awkward, particularly when you are reading exception messages that have been written using logging components such as log4net. These are:

1. Strongly typed exceptions that inherit from the Exception base class may contain extra properties that hold vital information. These are not shown by default.
2. Exceptions can contain inner exceptions, and often these are more informative than the outer exception. Sometimes this can go three or four levels deep.

I’ve experienced aspect 1 when using a number of the Google APIs, and aspect 2 with NHibernate.

The Exception extension method given below solves these issues respectively by:

1. Using reflection to write out all properties.
2. Iterating through all exception levels.

Here’s the code:

using System;
using System.Linq;
using System.Text;

namespace ExtensionMethods
{
    public static class ExceptionExtensionMethods
    {
        public static string GetFullExceptionDetails(this Exception exception, string customMessage = null)
        {
            var message = new StringBuilder();
            var exceptionLevel = 0;
            var currentException = exception;

            if (string.IsNullOrEmpty(customMessage))
            {
                message.AppendLine(customMessage);
            }

            // Loop over exceptions and inner exceptions:
            while (currentException != null)
            {
                exceptionLevel++;

                var title = string.Format("Exception Level {0}", exceptionLevel);

                message.AppendLine(new string('=', title.Length));
                message.AppendLine(title);
                message.AppendLine(new string('=', title.Length));

                // Read all properties associated with the exception:
                message.AppendLine(currentException.GetExceptionProperties());
                message.AppendLine();

                // Get the next leve of exception:
                currentException = currentException.InnerException;
            }

            return message.ToString();
        }

        private static string GetExceptionProperties(this Exception exception)
        {
            var properties = exception.GetType().GetProperties();

            var fields = properties.Select(
                property =>
                String.Format("{0}: {1}", property.Name, (property.GetValue(exception, null) ?? String.Empty)));

            return String.Join(Environment.NewLine, fields);
        }
    }
}

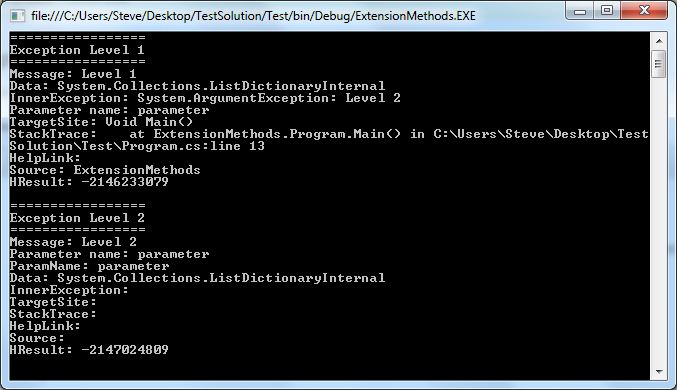
…which can be demonstrated using the following console application:

using System;

namespace ExtensionMethods
{
    public static class Program
    {
        public static void Main()
        {
            try
            {
                var argumentException = new ArgumentException("Level 2", "parameter");
                var invalidOperationException = new InvalidOperationException("Level 1", argumentException);
                throw invalidOperationException;
            }
            catch (Exception exception)
            {
                Console.WriteLine(exception.GetFullExceptionDetails("An error occurred"));
                Console.ReadLine();
            }
        }
    }
}

This outputs:

Exception Extension Method

There is still room for improvement, particularly in dealing with properties that contain collections, but the extra information could prove invaluable so it’s well worth the effort.