Simple AJAX ASP.NET MVC web-pages that work without JavaScript

AJAX, .NET 4, MVC etc… work together to make web-development very simple, and when Microsoft introduced @Ajax.BeginForm(…) it looked as though life couldn’t get any easier. However, now that jQuery is integrated into Visual Studio as well, I think there are better ways of building AJAX enabled web-pages that using Microsoft’s take on AJAX.

In this post I’ll be building an example solution that is AJAX enabled using jQuery, but works fine if the user has JavaScript switched off. (Although I’m not sure how many people that is this days. In 2010 some say it was around 2% of users but probably less now, although there are still going to be users with a valid reason why they need to keep it disabled.)

So, the final solution is going to look like this:

Simple Ajax 1

I started with an empty MVC 4 project in Visual Studio 2010 and added references to jQuery using the awesome NuGet.

IndexViewModel in the AjaxTest.Models.Home namespace looks like this:

namespace AjaxTest.Models.Home
{
    public class IndexViewModel
    {
        public string Value { get; set; }
    }
}

…it’s just a simple POCO with a single field. The Index.js file in the folder Scripts\Home\Index.js looks like this:

$(function () {
    $('form').submit(function () {
        $.ajax({
            url: this.action,
            type: this.method,
            data: $(this).serialize(),
            success: function (result) {
                $('#Target').html(result);
            }
        });
        return false;
    });
});

This looks for a form element and wires up an AJAX call in to the form submit event using jQuery. When the AJAX call completes, any data received is written to a div called Target. If this was anything other than a simple demonstration I would handle errors with a suitable pop-up. The ‘return false;’ statement at the end is really important. This tells JavaScript not to allow the form submit event to bubble up as normal when the code declared here completes.

Next is the Index.cshtml file, which is the display part of the application:

@model AjaxTest.Models.Home.IndexViewModel
@{
    Layout = null;
}
<!DOCTYPE html>
<html>
<head>
    <meta name="viewport" content="width=device-width" />
    <script language="javascript" type="text/javascript" src="@Url.Content("~/Scripts/jquery-1.9.1.js")"></script>
    <script language="javascript" type="text/javascript" src="@Url.Content("~/Scripts/Home/Index.js")"></script>    
    <title>Index</title>
</head>
<body>
    <div>
        @using (Html.BeginForm("Index", "Home"))
        {
            <div><input type="submit" value="Click to Update" /></div>
            <div id="Target">@Model.Value</div>
        }
    </div>
</body>
</html>

References to both jQuery and my own JavaScript file have been added, along with a model declaration. Inside the body tag is a normal HTML form, a submit button and the div that will be targetted by my AJAX call.

Finally, here is the code for the controller that binds everything together:

using System.Web.Mvc;
using AjaxTest.Models.Home;
using System;

namespace AjaxTest.Controllers
{
    public class HomeController : Controller
    {
        public ActionResult Index()
        {
            var viewModel = new IndexViewModel { Value = "No Value" };
            return View("Index", viewModel);
        }

        [HttpPost]
        public ActionResult Index(object formData)
        {
            var newValue = "Value: " + DateTime.Now;

            // Use an AJAX dialog if possible:
            if (Request.IsAjaxRequest())
            {
                return Content(newValue);
            }

            return View("Index", new IndexViewModel { Value = newValue });
        }
    }
}

The Get method creates a view model for the initial state of the page and renders our index page. The Post method is a little more interesting. This uses the Request.IsAjaxRequest() to determine whether the Post was performed using AJAX or good-old postbacks. If the former is true, some text (containing the time) is returned which our JavaScript function will insert into the div named Target. If not, the entire form is returned, still using the text that would have been passed back had JavaScript been enabled in the client browser.

The end result that the user receives is the same regardless of whether they have JavaScript enabled or not, but in cases where they do, a postback is avoided.

Thank you jQuery!

NOT EXISTS queries

This is the second post in my “Aides-Memoires” category. It’s a bit more complex than my first aides-memoires post on linking JavaScript and CSS, but still pretty basic.

This time I’m tackling the NOT EXISTS query in SQL. Again this is something that I often forget the syntax for and have to Google.

Aside: I haven’t actually had to write a NOT EXISTS query for a number of years now, and with the proliferation of ORMs such as NHibernate and Microsoft Entity Framework I rarely write raw SQL now anyway. However, there are always going to be times when highly complex queries and operations are required, and when execution time is paramount. At those times the most efficient way to get the job done is often to execute SQL directly on the database server using stored procedures, particularly when temporary tables and indexes are required.

For those moments, here’s how to write a NOT EXISTS query…

Note that I’m using T-SQL in SQL Server for these examples, although they will probably work with most relational databases without too much tweaking given the basic nature of the SQL used.

First let’s make some tables:

CREATE TABLE [Table1]
(
	[Id] [int] IDENTITY(1,1) NOT NULL,
	[Name] [varchar](100) NOT NULL,
	CONSTRAINT [PK_Table1] PRIMARY KEY CLUSTERED 
	(
		[Id] ASC
	)
)

CREATE TABLE [Table2]
(
	[Id] [int] IDENTITY(1,1) NOT NULL,
	[Name] [varchar](100) NOT NULL,
	CONSTRAINT [PK_Table2] PRIMARY KEY CLUSTERED 
	(
		[Id] ASC
	)
)

Now we populate some test data. Note that records are missing from Table2:

TRUNCATE TABLE Table1
TRUNCATE TABLE Table2

INSERT INTO Table1 (Name) VALUES ('One')
INSERT INTO Table1 (Name) VALUES ('Two')
INSERT INTO Table1 (Name) VALUES ('Three')
INSERT INTO Table1 (Name) VALUES ('Four')
INSERT INTO Table1 (Name) VALUES ('Five')

INSERT INTO Table2 (Name) VALUES ('One')
INSERT INTO Table2 (Name) VALUES ('Four')
INSERT INTO Table2 (Name) VALUES ('Five')

SELECT * FROM Table1
SELECT * FROM Table2

Note that I am clearing down the tables each time I add data to ensure a clean starting position, and returning the contents of both tables to show what’s been added. Running the query gives the following results:

NOT EXISTS 1

NOT EXISTS 2

To find rows that exist in Table1 but not Table2, use the following:

SELECT 
	Name
FROM
	Table1 T1
WHERE 
	NOT EXISTS
    (
        SELECT  
			Name
        FROM    
			Table2 T2
        WHERE   
			T1.Name = T2.Name
    )

As expected, this returns the following results set:

NOT EXISTS 3

Finally, to find missing rows and insert them into Table2, use the following:

INSERT INTO Table2
(
	Name
)
SELECT 
	Name
FROM
	Table1 T1
WHERE 
	NOT EXISTS
    (
        SELECT  
			Name
        FROM    
			Table2 T2
        WHERE   
			T1.Name = T2.Name
    )

On execution, this reports:

(2 row(s) affected)

…and a quick look into the Table2 using:

SELECT * FROM Table2

Returns:

NOT EXISTS 6

…as expected. Note that the values are in an odd order, proving that Two and Three were inserted last.

Linking JavaScript and CSS files

As well as hopefully helping other people out, one objectives of this blog is to act as an aide-memoire as I often find myself looking up the same things on Google over and over again, or thinking “I knew how to do that two months ago”. So, I’ve included a category called “Aides-Memoires” which contains posts only intended to jog my memory so that I don’t have to keep repeating the same Google searches. This post is the first of this type.

Despite being heavily involved in development using web-technologies for over 10 years, one thing I can never seem to remember is how to declare JavaScript and CSS files in the section of my HTML pages. This is extremely basic stuff but I can never remember the syntax! So, here is my aide-memoire:

JavaScript:

<script language="javascript" type="text/javascript" src="scripts/myScripts.js"></script>

CSS:

<link rel="stylesheet" type="text/css" href="styles/myStyles.css" />

Notice that in the above examples the linked JavaScript and CSS files need to be in folders called ‘scripts’ and ‘styles’ respectively in order for the links to work, and that these folders must exist at the same level as the page that is referencing them. If you were to move the referencing page to a sub-folder on the web-server for example, your linked files would no longer be accessible. I would call this a brittle solution.

If you’re lucky enough to be using ASP.NET MVC you also have the option of getting the .NET Framework to work out the relative paths to the files you need to reference. If you’re using the Razor engine, this is coded as follows:

JavaScript:

<script language="javascript" type="text/javascript" src="@Url.Content("~/scripts/myScripts.js")"></script> 

CSS:

<link rel="stylesheet" type="text/css" href="@Url.Content("~/styles/myStyles.css")" />

The tilde (~) simply means “start from the root level of my website”. This is a far less brittle solution.

Update:

I’ve just read that the Razor version 2 engine in ASP.NET MVC 4 is smart enough to not need the @Url.Content() helper. It automatically resolves tildas, so the following will suffice:

<script language="javascript" type="text/javascript" src="~/scripts/myScripts.js" ></script>

CSS:

<link rel="stylesheet" type="text/css" href="~/styles/myStyles.css" />

As well as being robust when files are moved around, an added benefit is that Intellisense still works correctly.

Calculate an average using NHibernate

Yesterday I was writing a dashboard application to summarise data held in a SQL Server database. Part of the dashboard involves showing the average of a certain value in rows added in the last hour, day, week and month. In the good old days this would have been easy; I would have written a stored procedure involing the AVG function. However, as I was using NHibernate I thought I would try and do this without writing any SQL (or indeed HQL). While I am a big fan of NHibernate this was much less straightforward than writing some simple SQL.

Here is the code I came up with:

public double GetAverage(DateTime dateFrom, DateTime dateTo)
{
	var query = Session.QueryOver().SelectList(list => list.SelectAvg(item => item.Value))
		.Where(x => x.Date >= dateFrom && x.Date <= dateTo);

	try
	{
		return query.List().First();
	}
	catch (GenericADOException exception)
	{
		// Note that if there are no results for the period (and the average is null) then we will
		// get a specific error back from NHibernate. We filter this out and return 0:
		if (exception.Message.StartsWith("Unable to perform find[SQL: SQL not available]", StringComparison.OrdinalIgnoreCase) && 
		    exception.InnerException != null && 
		    exception.InnerException.Message.StartsWith("Value cannot be null", StringComparison.OrdinalIgnoreCase))
		{
		    return 0;
		}

		// In all other cases we re-throw:
		throw;
	}
}

I discovered that if the query is ran over a period containing no data NHibernate throws an exception, hence the error trapping which returns 0 if the exact error referring to zero records is encountered.

Interestingly, when I turned on Log4Net SQL logging I found that NHibernate generates exactly the same SQL I would have written myself in the good old days:

SELECT avg(cast(this_.Value as DOUBLE PRECISION)) as y0_ 
FROM [Item] this_ 
WHERE 
	(this_.Date >= @p0 and this_.Date <= @p1);
@p0 = 28/03/2013 20:17:04 [Type: DateTime (0)], 
@p1 = 28/03/2013 21:17:04 [Type: DateTime (0)]

Nice work NHibernate!

Registering many like types in Castle Windsor

Castle Windsor is an awesome dependency injection framework available for use with .NET. While a full explanation of dependency injection is beyond the scope of this post, two key reasons to use a dependency injection framework are:

1) Code using dependency injection is less “tightly-coupled” and thus less brittle.
2) Dependency injection is vital in order to achieve true test driven development (incorporating unit-testing and mocking).

Anyone familiar with Castle Windsor will know that individual types can be registered as follows:

container.Register(
                Component.For<IUserRepository>()
                .ImplementedBy(typeof(UserRepository))
                .LifeStyle.Transient);

However, it is often the case that we have many “like” classes in an application, all providing similar functionality and having a similar naming convention. A good example would be respository classes, particularly when using ORM frameworks. Rather than manually adding each repository to the dependency container, Castle Windsor has a neat shortcut for registering multiple classes:

container.Register(Classes.FromAssemblyContaining(typeof(UserRepository))
                .Where(type => type.Name.EndsWith("Repository"))
                .If(type => type.Namespace.StartsWith("MyApplication.Api.Data.Repositories"))
                .WithService.FromInterface(typeof(IRepository))
                .Configure(c => c.LifestyleTransient()));

The code above will find all classes implementing the interace IRepository in the namespace MyApplication.Api.Data.Repositories (and its children) that have Repository at the end of their name. These can then be accessed at runtime using:

var userRepository = injector.Resolve<IUserRepository>();
var productRepository = injector.Resolve<IProductRepository>();

Very cool!

Encapsulated and strongly-typed access to .NET configuration files

.NET is a strongly-typed object-oriented language, and it is my firm belief that everything we do within it should be strongly-typed and object-oriented in design. A trivial example would be to use the Uri class when dealing with URLs rather than simply passing strings around.

A central theme in object-orientation is encapsulation, which, in layman’s terms, I take to mean “when modelling a particular type of granular thing, the code for that thing should be contained in a single place”. There are a whole host of reasons why encapsulation is good practice, not least that it makes it really easy to change the way an aspect of the code works if changes only have to be made in one place. Better still, if things are encapsulated and strongly-typed, code changes that break other functionality can be found simply by recompiling, rather than having to execute the entire codebase looking for runtime errors.

In my opinion, interactions with standard .NET configuration files should be encapsulated and strongly-typed. Sure, it is possible to access configuration settings by littering code with calls to AppSettingsReader or ConfigurationManager, but this is neither encapsulated nor strongly-typed. If the return type for a setting appearing in many places in the code needed to change and AppSettingsReader/ConfigurationManager had been used throughout the code, this change would break existing code, and worst still, broken code would only be found at runtime. “Find and replace” could be used to find every instance of the setting in the code, but this is hardly ideal and may not find all instances if another coder had been clever and used constants for the key names. Similarly, if the way that configuration values were served needed to be changed, for instance by switching from the standard .NET configuration model to some other type of configuration provider such as a database you’d have to make changes throughout the code-base.

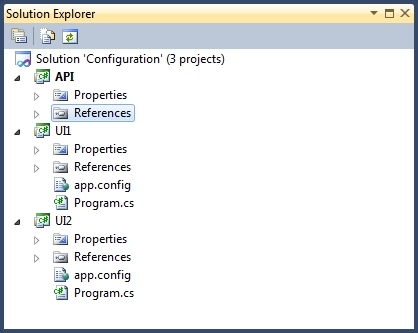
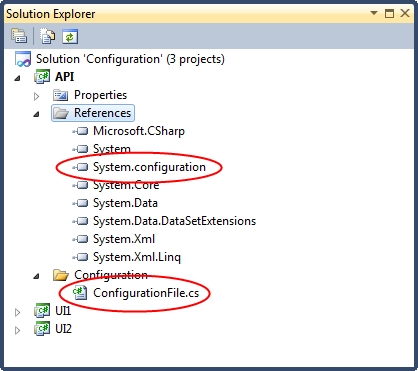
Keeping code to access the configuration file in one place feels like a much more elegant solution. So, how do I normally do this? Well, let’s assume an application with two UIs (User Interfaces) and an API layer (Application Programming Interface) as follows:

Encapsulated Configuration 01

Note that the example solution in this post has been included on GitHub here:

https://github.com/stevebarker333/Encapsulated-Strongly-Typed-Configuration-Files

In this example, both UIs are console applications, although in reailty these could be anything, including Windows Services, websites or Windows Applications. (Beware the .NET Framework 4 Client Profile issue if you are going to follow this example yourself!)

As configuration is owned at the level of the executing assembly, classes to encapsulate configuration settings should exist in the UI projects. However, these classes will share underlying functionality to interact with the configuration files, and so we create a base class in the API project from which all executable-level configuration file classes inherit:

using System;
using System.Configuration;

namespace API.Configuration
{
    public abstract class ConfigurationFile
    {
        private readonly AppSettingsReader appSettingsReader = new AppSettingsReader();

        protected string ReadString(string key)
        {
            try
            {
                return (string)appSettingsReader.GetValue(key, typeof(string));
            }
            catch (Exception exception)
            {
                var message = string.Format("Could not read key {0} from configuration file", key);
                throw new ConfigurationErrorsException(message, exception);
            }
        }

        protected int ReadInt(string key)
        {
            try
            {
                var value = this.ReadString(key);
                return int.Parse(value);
            }
            catch (Exception exception)
            {
                var message = string.Format("Could not read an int from key {0} in the configuration file", key);
                throw new ConfigurationErrorsException(message, exception);
            }
        }

        protected Uri ReadUri(string key)
        {
            try
            {
                var value = this.ReadString(key);
                return new Uri(value);
            }
            catch (Exception exception)
            {
                var message = string.Format("Could not read a Uri from key {0} in the configuration file", key);
                throw new ConfigurationErrorsException(message, exception);
            }
        }
    }
}

Note that all settings are first read as strings using the ReadString method. Other strongly-typed values are then derived from this method. I’ve included ReadInt and ReadUri functionality. More methods can be added to the base class as they are needed, but by the laws of YAGNI, don’t try and second guess every type your application will need up-front!

This class should be placed in a folder called Configuration to get the namespace shown. Additionally, a reference to System.Configuration will need to be added to access the exception classes from within our new base class:

Encapsulated Configuration 02

We can now start adding configuration at UI level. Here is my configuration file in UI1:

<?xml version="1.0"?>
<configuration>	
	<appSettings>
		<!-- UI1 Specific Settings -->
		<add key="UI1String" value="UI1.String"/>
		<add key="UI1Int" value="1"/>
		<add key="UI1Uri" value="http://www.ui1.com"/>
		<!-- Settings Required By API -->
		<add key="CoreString" value="Core.String"/>
		<add key="CoreInt" value="0"/>
		<add key="CoreUri" value="http://www.core.com"/>
	</appSettings>	
</configuration>

…and for UI2:

<?xml version="1.0"?>
<configuration>
	<appSettings>
		<!-- UI2 Specific Settings -->
		<add key="UI2String" value="UI2.String"/>
		<add key="UI2Int" value="2"/>
		<add key="UI2Uri" value="http://www.ui2.com"/>
		<!-- Settings Required By API -->
		<add key="CoreString" value="Core.String"/>
		<add key="CoreInt" value="0"/>
		<add key="CoreUri" value="http://www.core.com"/>
	</appSettings>
</configuration>

In order to simulate the kinds of scenarios that occur in enterprise solutions, I’ve included settings specific to the executing assembly and shared settings that are required by the API in each configuration file. An example of this would be a web-UI that needs a configuration setting as to how many search results to show on each page of paged search results, with an API responsible for performing the search which needs a configuration setting containing the database connection string to search against.

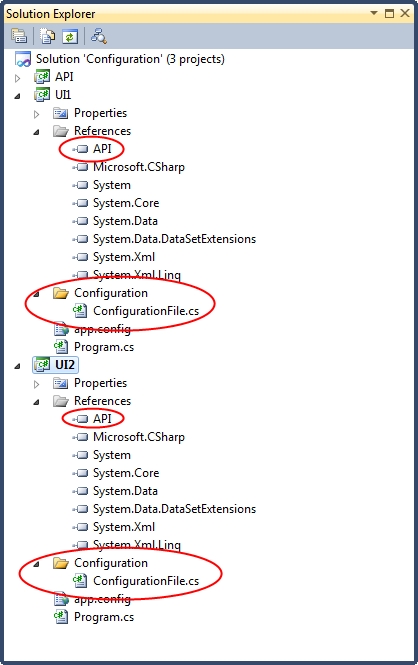
We can now write our strongly-typed encapsulated configuration file classes in each of the UIs. They have been added to each UI project as follows, along with references to the API project:

Encapsulated Configuration 03

Here is the class for UI1:

using System;

namespace UI1.Configuration
{
    public class ConfigurationFile : API.Configuration.ConfigurationFile
    {
        public string UI1String
        {
            get
            {
                return this.ReadString("UI1String");
            }
        }

        public int UI1Int
        {
            get
            {
                return this.ReadInt("UI1Int");
            }
        }

        public Uri UI1Uri
        {
            get
            {
                return this.ReadUri("UI1Uri");
            }
        }

        public string CoreString
        {
            get
            {
                return this.ReadString("CoreString");
            }
        }

        public int CoreInt
        {
            get
            {
                return this.ReadInt("CoreInt");
            }
        }

        public Uri CoreUri
        {
            get
            {
                return this.ReadUri("CoreUri");
            }
        }
    }
}

…and for UI2:

using System;

namespace UI2.Configuration
{
    public class ConfigurationFile : API.Configuration.ConfigurationFile
    {
        public string UI2String
        {
            get
            {
                return this.ReadString("UI2String");
            }
        }

        public int UI2Int
        {
            get
            {
                return this.ReadInt("UI2Int");
            }
        }

        public Uri UI2Uri
        {
            get
            {
                return this.ReadUri("UI2Uri");
            }
        }

        public string CoreString
        {
            get
            {
                return this.ReadString("CoreString");
            }
        }

        public int CoreInt
        {
            get
            {
                return this.ReadInt("CoreInt");
            }
        }

        public Uri CoreUri
        {
            get
            {
                return this.ReadUri("CoreUri");
            }
        }
    }
}

Note that each configuration file inherits from our shared base class so that it can access the ReadString (and similar) methods defined earlier. As the core/shared settings are shared with the API, then there is an argument for putting the property getters for these properties in the base configuration file class. However, I would argue against this approach as it means the API is dictating how the UI must organise its configuration file. If you’re comfortable with this approach then that’s fine; however I prefer to use an interface in the API to enforce the existence of shared settings in each UI. This allows the UI developer free choice to use any key names they deem fit for core settings. Let’s create this now in the following location:

Encapsulated Configuration 04

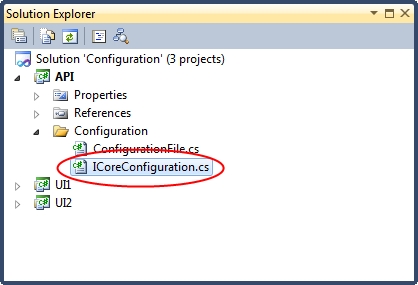
The interface is as follows:

using System;

namespace API.Configuration
{
    public interface ICoreConfiguration
    {
        string CoreString { get; }

        int CoreInt { get; }

        Uri CoreUri { get; }
    }
}

This interface is then applied to each of the configuration file classes in the UI:

using System;

namespace UI1.Configuration
{
    public class ConfigurationFile : API.Configuration.ConfigurationFile, API.Configuration.ICoreConfiguration
    {
	...        
    }
}
using System;

namespace UI2.Configuration
{
    public class ConfigurationFile : API.Configuration.ConfigurationFile, API.Configuration.ICoreConfiguration
    {
	...        
    }
}

The ground work has now all been done. All that remains is to put some example code into the UIs and API to demonstrate how our configuration classes and used, and that they do indeed pick up the correct settings.

I’ve added a class to the API to access the core settings:

Encapsulated Configuration 05

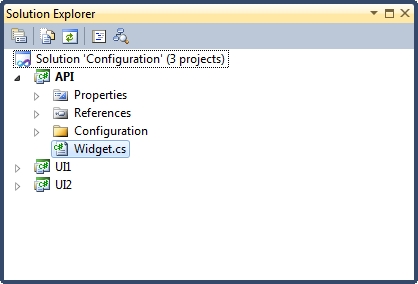
…which looks as follows:

using API.Configuration;

namespace API
{
    using System;

    public class Widget
    {
        private readonly ICoreConfiguration configuration;

        public Widget(ICoreConfiguration configuration)
        {
            this.configuration = configuration;    
        }

        public void DoSomething()
        {
            Console.WriteLine(configuration.CoreString);
            Console.WriteLine(configuration.CoreInt);
            Console.WriteLine(configuration.CoreUri);
        }
    }
}

Note that it is constructed with the type ICoreConfiguration so that it can use the core configuration settings without caring how they’ve be implemented. (Note also that this approach is still valid when using Dependency Injection, which I’ll cover in a future post.)

I’ve also included the following code in the Program class of UI1:

using System;
using UI1.Configuration;
using API;

namespace UI1
{
    public static class Program
    {
        public static void Main()
        {
            var configurationFile = new ConfigurationFile();

            Console.WriteLine(configurationFile.UI1String);
            Console.WriteLine(configurationFile.UI1Int);
            Console.WriteLine(configurationFile.UI1Uri);

            var widget = new Widget(configurationFile);
            widget.DoSomething();

            Console.ReadLine();
        }
    }
}

…and the following code in the Program class of UI2:

using System;
using UI2.Configuration;
using API;

namespace UI2
{
    public static class Program
    {
        public static void Main()
        {
            var configurationFile = new ConfigurationFile();

            Console.WriteLine(configurationFile.UI2String);
            Console.WriteLine(configurationFile.UI2Int);
            Console.WriteLine(configurationFile.UI2Uri);

            var widget = new Widget(configurationFile);
            widget.DoSomething();

            Console.ReadLine();
        }
    }
}

Running UI1 yields:

Encapsulated Configuration 06

…and running UI2 yields:
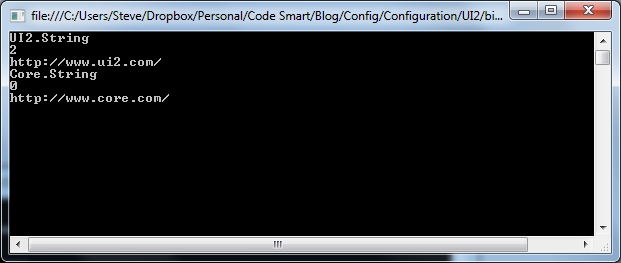
Encapsulated Configuration 07

…both as expected.

So, that concludes my exploration of strongly-typed encapsulated configuration files. Although it’s a bit more effort to implement than directly accessing the .NET configuration classes throughout code, it is more logical and far less brittle.

A final note: the .NET Framework automatically caches configuration file values in memory so there is no performance gain from storing configuration values in local class variables within each of our strongly-typed configuration file classes.

Update: As mentioned above, I’ve now extended the above by incorporating dependency injection. See my new post entitled Encapsulated and strongly-typed access to .NET configuration files with dependency injection.

Testing Windows Services

Windows Services should be part of any .NET developer’s arsenal as most enterprise solutions involve at least one Windows Service. Writing Windows Services is simple, and there are plenty of articles online to tell you how to do this. Testing Windows Services on the other hand, is a totally different story!

Of course, you could keep registering and running your service each time you make a change in order to test it, but this approach quickly becomes frustrating. A better technique that I use is to create a service wrapper console application project in the same solution as the service and run that each time I make a change. Here’s how…

Create a Windows Service. Your Solution Explorer should look a little something like this:

Testing Windows Services 1

Note that I’ve renamed Service1 to Service due to my OCD tendencies when it comes to naming conventions. I’ve created a simple test service with the following code in the Service.cs file:

using System.IO;
using System.ServiceProcess;

namespace MyService
{
    public partial class Service : ServiceBase
    {
        public Service()
        {
            InitializeComponent();
        }

        protected override void OnStart(string[] args)
        {
            using (var stream = new FileStream("Running", FileMode.Create, FileAccess.ReadWrite, FileShare.ReadWrite))
            {
                using (var writer = new StreamWriter(stream))
                {
                    writer.WriteLine("Running");
                    writer.Flush();
                }
            }
        }

        protected override void OnStop()
        {
            var fileInfo = new FileInfo("Running");
            if (fileInfo.Exists)
            {
                fileInfo.Delete();
            }
        }
    }
}

This just creates a file in the same directory as the service when the thing starts up, and deletes the file when it stops.

The service wrapper is just a console application, so add one of these to your solution. (Please note my post on the “.NET Framework 4 Client Profile” default setting for target framework when creating console applications as this may cause issues.) You will also need to reference your service project in the console application, along with a reference to System.ServiceProcess. The wrapper should then be set as the start up project:

Testing Windows Services 2

Add a class called ServiceWrapper to the console application as follows:

namespace MyService.Wrapper
{
    public class ServiceWrapper : Service
    {
        public void TestStart()
        {
            base.OnStart(new string[] { });
        }

        public void TestStop()
        {
            base.OnStop();
        }
    }
}

Notice that the wrapper inherits from my actual service, and exposes the OnStart and OnStop methods publically. This is a simple implementation of the facade pattern, and allows the console application to call service methods.

Then add the following code to the Program class in the console application:

using System;

namespace MyService.Wrapper
{
    public class Program
    {
        public static void Main(string[] args)
        {
            var serviceWrapper = new ServiceWrapper();

            try
            {
                serviceWrapper.TestStart();
                Console.ReadLine();
                serviceWrapper.TestStop();
            }
            catch (Exception exception)
            {
                Console.WriteLine("Error: " + exception.Message);
                Console.ReadLine();
            }
        }
    }
}

When the console application is run, the wrapper simulates the service starting up and then waits for a key press in the console window. The service will then execute as though it had been installed and ran. If you follow this example, you’ll see the file called “Running” appear and disappear. I recommend putting a breakpoint in the catch block of the Program class to help diagnose any issues you may encounter.

This approach can still be used if you use dependency injection, although you will need to manually inject any required dependencies into the service via the Program class in your wrapper. I’ll cover that in a future article.

Update: Note that if your Windows Service uses a .NET configuration file, you’ll need to share this with the console application. The best way to do this (to avoid duplicating settings between two configuration files) is to add the Windows Service configuration file to the console application as a link file. That way the console application will always use the Windows Service’s version of the file.

Console application pitfalls: .NET Framework 4 Client Profile

Console applications are extremely useful for testing out bits of code before you’re ready to start writing production code. For instance, I use them when getting to grips with new third party components. These applications are supposed to be throw away and so coding standards are not usually adhered to!

One thing I often forget is that by default, console applications start with the target framework set to “.NET Framework 4 Client Profile”, as in the following properties window screenshot:

.NET Framework 4 Client Profile

Symptoms of this include references missing from the references dialog box, methods not being available in Intellisense and code generally not behaving as expected. I’m not exactly sure why “.NET Framework 4 Client Profile” is available in the first place or why it’s so restrictive. I’ve also not bothered to research this, although I suspect it’s probably to allow code to run in environments with low security permissions. However, for throw away code or code that is never going to leave your infrastructure I’d advise getting into the habit of changing the target framework to “.NET Framework 4” each time you make a new console application, otherwise you’re likely to end up scratching your end when simple stuff doesn’t work as expected.

Monitoring website up-time

Most web-hosting firms specify the level of “up-time” you can expect to get on your website. Typically this is given as a percentage (e.g. 99.99%, 99.999%, etc…), but how do you know if they’re really telling the truth? After all, you can’t measure this yourself.

I currently use Pingdom to measure up time for my sites. Pingdom constantly monitors websites and produces a monthly report stating the uptime. It also emails me to tell me each time my site does not respond for a period of time (i.e. it is down), and when it comes back up again. The basic package is totally free and perfectly adequate if all you want is to receive up-time statistics and site-down alerts.

WordPress and Google Analytics

Following on from my last post in which I describe how to include code snippets in WordPress posts, I also decided it would also be great to track visitors to my blog using Google Analytics. Fortunately, this was very easy to set up.

The first step is to create a Google Analytics account. This is easy and fully explained by Google so I won’t go into details here. Once you have created your account you should be able to see your tracking code, which for me looks like this:

<script type="text/javascript">// <![CDATA[

  var _gaq = _gaq || [];
  _gaq.push(['_setAccount', 'UA-39305296-1']);
  _gaq.push(['_trackPageview']);

  (function() {
    var ga = document.createElement('script'); ga.type = 'text/javascript'; ga.async = true;
    ga.src = ('https:' == document.location.protocol ? 'https://ssl' : 'http://www') + '.google-analytics.com/ga.js';
    var s = document.getElementsByTagName('script')[0]; s.parentNode.insertBefore(ga, s);
  })();

// ]]></script>

To monitor your WordPress site using Google Analytics you simply need to open the editor under the ‘Appearance’ menu, select Footer (footer.php) and paste the entire tracking code block just before the closing body tag:

</body>

Once done, Google Analytics will monitor traffic to your site.

Addendum: Warning! Updating your WordPress theme will overwrite any customisations you have made to the files. So, if you run a WordPress auto-update, be prepared to have to re-paste the Google Analytics code in again.