Allowing Castle Windsor to resolve two interfaces to the same instance

There are times when it’s useful to be able to resolve two different interfaces to the same type when using Castle Windsor for dependency injection. Given a class called MyClass which implements two interfaces, IOne and ITwo, the following code will achieve this:

container.Register(
                Component.For<IOne, ITwo>()
                .ImplementedBy(typeof(MyClass))
                .LifeStyle.Singleton);

This can be simply demonstrated using the following classes:

namespace TwoInterfaces
{
    public interface IOne
    {
        string GetMessage();
    }

    public interface ITwo
    {
        string GetMessage();
    }

    public class MyClass : IOne, ITwo
    {
        public string GetMessage()
        {
            return "Hello World!";
        }
    }
}

…in a console application. Running the following program class:

using System;

namespace TwoInterfaces
{
    public static class Program
    {
        public static void Main(string[] args)
        {
            var injector = Injector.Instance;

            var one = injector.Resolve<IOne>();
            var two = injector.Resolve<ITwo>();

            Console.WriteLine(one.GetMessage());
            Console.WriteLine(two.GetMessage());
            Console.WriteLine(one.Equals(two));

            Console.WriteLine("Press RETURN to exit...");
            Console.ReadLine();
        }
    }
}

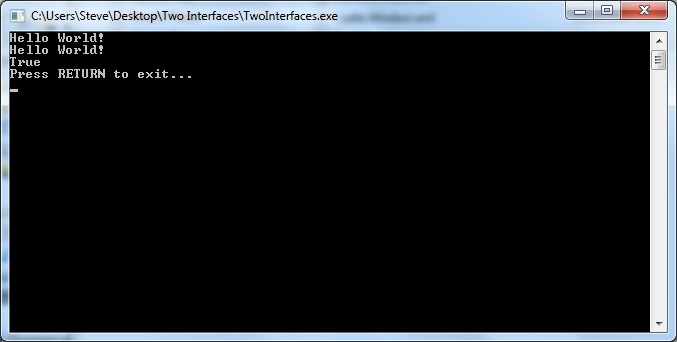
…yields:

CastleWindsorTwoInterfaces

…as expected. My post entitled Basic dependency injection with Castle Windsor explains how to set up a fully working Castle Windsor injector in more detail.

Deleting a local branch using the GitHub command line

Although it’s taken me a while to get to this point, I have to say that I really like GitHub. Historically I’ve used either VSS, TFS or SVN for source control. Each has its quirks, but essentially they all work in a similar fashion. GitHub feels (and probably is) vastly different.

Not being a massive fan of using command lines for simple tasks I do everyday, I use GitExtensions to add a UI to GitHub. It allows me to do pretty much everything I can do using the GitHub command line, and integrates really well with Visual Studio. However, one of the things it won’t let me do is delete a local branch quickly, especially if I have a few such branches to delete. I tend to use the GitHub website to deleted remote branches.

So, here’s the command to delete a local branch:

git branch -d the_local_branch_name 

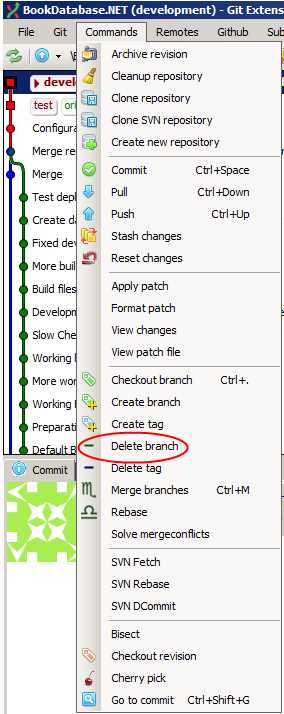
Correction: I’ve since realised that it is possible to delete a local branch using the UI, as shown in the following screenshot:

Deleting branches

Deleting old IIS logs

The other week a business I was working with experienced “a perfect storm”. A production web-server ran out of disk space due to the build-up of IIS logs. Normally the standard monitoring tools used by the organisation would have picked this up, but it turns out they hadn’t been configured properly and so the alerts were being emailed to the wrong team! After various “it shouldn’t have been possible” conference calls, we decided to automate the deletion of log files for IIS (and for another system) after seven days. I figured this functionality would be offered out of the box by IIS. I was wrong!

Instead, I found this awesome post on Stack Overflow that answered the question using the forfiles command.

I create a daily schedule containing the following command to delete IIS logs:

forfiles /p "C:\inetpub\logs\LogFiles" /s /m "*.*" /c "cmd /c Del @path" /d -7

…and this to delete my other log files:

forfiles /p "C:\application_name\logs\" /m "application_name.log*.log" /c "cmd /c Del @path" /d -7

Note that I dropped the /s in the second command because I know that my application logs are all in a specific folder, and the file name pattern I’m using matches roll-over files created by log4net.

This works like a dream.

JavaScript find and replace all

I was doing some string manipulation the other day using JavaScript. The following code demonstrates the sort of operation I was attempting:

<script type="text/javascript">
    var text = "1234321234321";
    text = text.replace("1", "X");
    alert(text);
</script>

I was expecting the output to be X23432X23432X, but instead got X234321234321. I didn’t realise that the replace method only works on the first instance of the text to be replaced that it finds! I wanted to avoid looping to remove all instances, and instead found this rather nice example on the web that uses regular expressions to replace all instances:

<script type="text/javascript">
    var text = "1234321234321";
    text = text.replace(/1/g, 'X'); 
    alert(text);
</script>

This gives the desired result.

Exception extension method to show full exception details

While I think the exception model in .NET is very good, there are two aspects which can make diagnosing issues awkward, particularly when you are reading exception messages that have been written using logging components such as log4net. These are:

1. Strongly typed exceptions that inherit from the Exception base class may contain extra properties that hold vital information. These are not shown by default.
2. Exceptions can contain inner exceptions, and often these are more informative than the outer exception. Sometimes this can go three or four levels deep.

I’ve experienced aspect 1 when using a number of the Google APIs, and aspect 2 with NHibernate.

The Exception extension method given below solves these issues respectively by:

1. Using reflection to write out all properties.
2. Iterating through all exception levels.

Here’s the code:

using System;
using System.Linq;
using System.Text;

namespace ExtensionMethods
{
    public static class ExceptionExtensionMethods
    {
        public static string GetFullExceptionDetails(this Exception exception, string customMessage = null)
        {
            var message = new StringBuilder();
            var exceptionLevel = 0;
            var currentException = exception;

            if (string.IsNullOrEmpty(customMessage))
            {
                message.AppendLine(customMessage);
            }

            // Loop over exceptions and inner exceptions:
            while (currentException != null)
            {
                exceptionLevel++;

                var title = string.Format("Exception Level {0}", exceptionLevel);

                message.AppendLine(new string('=', title.Length));
                message.AppendLine(title);
                message.AppendLine(new string('=', title.Length));

                // Read all properties associated with the exception:
                message.AppendLine(currentException.GetExceptionProperties());
                message.AppendLine();

                // Get the next leve of exception:
                currentException = currentException.InnerException;
            }

            return message.ToString();
        }

        private static string GetExceptionProperties(this Exception exception)
        {
            var properties = exception.GetType().GetProperties();

            var fields = properties.Select(
                property =>
                String.Format("{0}: {1}", property.Name, (property.GetValue(exception, null) ?? String.Empty)));

            return String.Join(Environment.NewLine, fields);
        }
    }
}

…which can be demonstrated using the following console application:

using System;

namespace ExtensionMethods
{
    public static class Program
    {
        public static void Main()
        {
            try
            {
                var argumentException = new ArgumentException("Level 2", "parameter");
                var invalidOperationException = new InvalidOperationException("Level 1", argumentException);
                throw invalidOperationException;
            }
            catch (Exception exception)
            {
                Console.WriteLine(exception.GetFullExceptionDetails("An error occurred"));
                Console.ReadLine();
            }
        }
    }
}

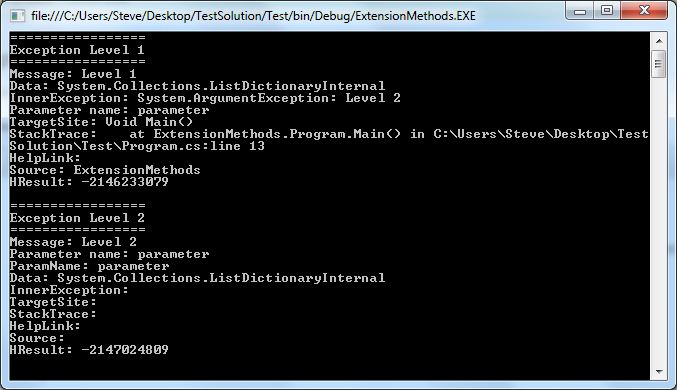
This outputs:

Exception Extension Method

There is still room for improvement, particularly in dealing with properties that contain collections, but the extra information could prove invaluable so it’s well worth the effort.

Generic retry loops

Now more than ever I’m finding that the systems I write are required to communicate with a whole host of other systems. With “cloud computing” becoming ever more popular this trend will no doubt continue. Two obvious examples are databases and web-services (either directly or through APIs). Systems that rely on other applications and end-points naturally have extra failure points that we need to consider. More often than not, when calls to external end-points fail the problems are transient. That is to say if we try the same operation a little later the call magically works. There are many reasons why we experience transient errors, with some examples being insufficient band-width, transmission errors or servers being too busy to respond in a timely fashion. Of course, the end-point could be permanently down so our code should handle this gracefully, but usually pausing and retrying usually solves the problem.

Implementing a retry loop isn’t a difficult task, but given a class that calls a number of different methods of the same remote end-point, we don’t want to duplicate the retry code for each call. Fortunately, a relatively new feature in .NET makes implementing generic retry loops much easier. Using our old friend the console application (and with the same disclaimer about client profiles as always) I’ve written a calculator class that we will be calling using a retry loop:

using System;

namespace RetryLoops
{
    public class Calculator
    {
        private readonly Random random;

        public Calculator()
        {
            unchecked
            {
                random = new Random((int)DateTime.Now.Ticks);
            }
        }

        public int Add(int x, int y)
        {
            var value = random.Next(0, 5);

            if (value == 0)
            {
                throw new InvalidOperationException("Transient error!");
            }

            return x + y;
        }

        public int Subtract(int x, int y)
        {
            var value = random.Next(0, 5);

            if (value == 0)
            {
                throw new InvalidOperationException("Transient error!");
            }

            return x - y;
        }
    }
}

Note that the Add and Subtract methods have a 1 in 5 chance of throwing an exception when they’re called. This is to simulate transient errors. Note also that I’m using the seeding technique for random numbers that I introduced in my last post.

I’ve coded the Program class as follows:

using System;

namespace RetryLoops
{
    public static class Program
    {
        public static void Main()
        {
            var calculator = new Calculator();

            Console.WriteLine(calculator.Add(1, 2));
            Console.WriteLine(calculator.Subtract(1, 2));
            Console.WriteLine(calculator.Add(1, 2));
            Console.WriteLine(calculator.Subtract(1, 2));
            Console.WriteLine(calculator.Add(1, 2));
            Console.WriteLine(calculator.Subtract(1, 2));
            Console.WriteLine(calculator.Add(1, 2));
            Console.WriteLine(calculator.Subtract(1, 2));
            Console.WriteLine(calculator.Add(1, 2));
            Console.WriteLine(calculator.Subtract(1, 2));
            Console.WriteLine(calculator.Add(1, 2));
            Console.WriteLine(calculator.Subtract(1, 2));

            Console.ReadLine();
        }
    }
}

You don’t need to run this very many times before you get an unhandled exception.

Adding a method called ExecuteOperationWithRetry to the program and changing the main method to use this gives:

using System;
using System.Threading;

namespace RetryLoops
{
    public static class Program
    {
        public static void Main()
        {
            var calculator = new Calculator();

            Console.WriteLine(ExecuteOperationWithRetry(() => calculator.Add(1, 2)));
            Console.WriteLine(ExecuteOperationWithRetry(() => calculator.Subtract(1, 2)));
            Console.WriteLine(ExecuteOperationWithRetry(() => calculator.Add(1, 2)));
            Console.WriteLine(ExecuteOperationWithRetry(() => calculator.Subtract(1, 2)));
            Console.WriteLine(ExecuteOperationWithRetry(() => calculator.Add(1, 2)));
            Console.WriteLine(ExecuteOperationWithRetry(() => calculator.Subtract(1, 2)));
            Console.WriteLine(ExecuteOperationWithRetry(() => calculator.Add(1, 2)));
            Console.WriteLine(ExecuteOperationWithRetry(() => calculator.Subtract(1, 2)));
            Console.WriteLine(ExecuteOperationWithRetry(() => calculator.Add(1, 2)));
            Console.WriteLine(ExecuteOperationWithRetry(() => calculator.Subtract(1, 2)));
            Console.WriteLine(ExecuteOperationWithRetry(() => calculator.Add(1, 2)));
            Console.WriteLine(ExecuteOperationWithRetry(() => calculator.Subtract(1, 2)));

            Console.ReadLine();
        }

        private static TReturn ExecuteOperationWithRetry<TReturn>(Func<TReturn> operation)
        {
            const int MaximumAttempts = 10;
            var timeBetweenRetries = TimeSpan.FromMilliseconds(100);

            var attempts = 0;
            
            while (true)
            {
                try
                {
                    attempts++;
                    return operation.Invoke();
                }
                catch (Exception exception)
                {
                    // If the exception isn't transient then re-throw:
                    if (!(exception is InvalidOperationException))
                    {
                        throw;
                    }

                    // If we've had all our attempts already then re-throw:
                    if (attempts >= MaximumAttempts)
                    {
                        throw;
                    }

                    // Wait before making another attempt:
                    Console.WriteLine("Transient error encountered, retrying...");
                    Thread.Sleep((int)(timeBetweenRetries.TotalMilliseconds * Math.Pow(2, attempts - 1)));
                }
            }
        }
    }
}

As the operation parameter of ExecuteOperationWithRetry is of type Func we can execute and retry any function we like without caring about the specific implementation of the function. In your own implementation you’ll probably want to get MaximumAttempts and timeBetweenRetries from a configuration file rather than hard-coding them, and you’ll probably also want to alter the exceptions that you retry on to suit the type of end-point. The Console.WriteLine statement in ExecuteOperationWithRetry is included only for demonstration purposes, and note that we are using the Math.Pow function to ensure that we wait a little longer each time we hit a transient error. This means that on the first attempt we wait for 100 milliseconds, then 200, 400, 800, 1600, etc… Once we’ve had 10 attempts we assume that the end-point is permanently broken and allow the exception to bubble up where (hopefully!) it’ll be caught by the calling method and handled appropriately.

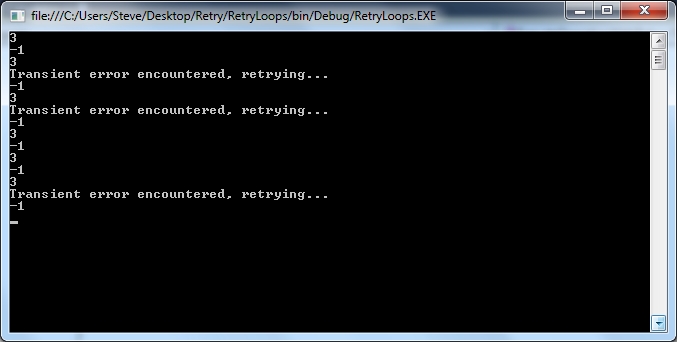
When I ran this I got the following:

Retries 01

…which proves the retry loop is doing its job.

To make the code even more generic we can add the following overload of the ExecuteOperationWithRetry method, enabling us to handle operations that don’t have return values:

private static void ExecuteOperationWithRetry(Action operation)
{
    Func<bool> operationWithReturn = () => 
    {
        operation.Invoke();
        return true;
    };

    ExecuteOperationWithRetry(operationWithReturn);
}

There is a lot of scope to improve this technique, and to tailor it to specific applications. In fact, it is possible to make a totally generic retry loop component that has the exceptions to retry, time to pause and number of attempts to make passed in as constructor arguments. I’ll cover this in a future article, but for now, this concludes my exploration of retry loops.

Seeding the .NET random number generator

Occasionally I find myself generating random numbers/strings in C#. An example came up today where a SAML request token needed a unique ID consisting of 41 lowercase alphabet characters, which I generated using the Random class.

The constructor for this class has two overloads:

Random()
Random(int seed)

Apparently, computers don’t actually generate true random numbers but pseudo-random numbers as they are generated following a pattern. The starting point for the pattern is determined by a “seed”. The parameterless constructor uses a time-dependent seed, while the second constructor allows a user-defined seed. Most of the applications that I write involving random numbers use only one instance of the Random class, so I tend to use the following pattern when I instantiate it:

using System;

namespace RandomNumbers
{
    public static class Program
    {
        public static void Main()
        {
            Random random;
            unchecked
            {
                random = new Random((int)DateTime.Now.Ticks);
            }

            Console.WriteLine("Roll: {0}", random.Next(1, 7));
            Console.ReadLine();
        }
    }
}

The unchecked keyword ensures that we don’t get an overflow when we try and squeeze a 64-bit value into a 32-bit variable.

ASP.NET MVC controller dependency injection using Castle Windsor

In a previous post I looked at basic dependency injection. In this post I demonstrated dependency injection using a simple example in which all functionality in the application was wrapped up in a single class (TimeWriter) with an associated interface (ITimeWriter). The application uses the dependency injection framework to get an instance of this class by its interface. In the process of doing this, all dependencies within the class are also satisfied. The application can then run as normal and write the date and time to the screen.

This approach is fine for console applications as they usually only have one entry point (the Main method) and from there we have complete control over the all code that runs once the application has started. Including dependency injection in ASP.NET MVC web-applications isn’t so straightforward as by default we don’t have control over how code runs right from the start of a user request. The MVC routing engine interprets the request, maps this to a controller, instantiates the controller (using the default controller factory) and calls the correct method on the controller instance. We then get to steer the code execution within the controller method. From a programming perspective, MVC development is like writting an application with multiple entry points contained in multiple controllers.

As we don’t get to instantiate the controller for ourselves there is no obvious way to include dependency injection, unless we write a class and interface for every controller operation and register them with the dependency injection engine in an analogous fashion to the console application example. This would work but it’s clearly not a good idea!

Fortunately ASP.NET MVC allows us to specify custom controller factories, and Castle Windsor includes classes to make it very simple to include dependency injection in this customisation process. Once configured, you can include dependencies as properties in your controllers which, along with the controllers themselves, are resolved by Castle Windsor each time a user request is received.

This time I’m starting with an Empty ASP.NET MVC application using the Razor view engine. The application and the containing solution are called ControllerInjection. Once created, I use NuGet to add a reference to Castle Windsor. My starting point thus looks like this:
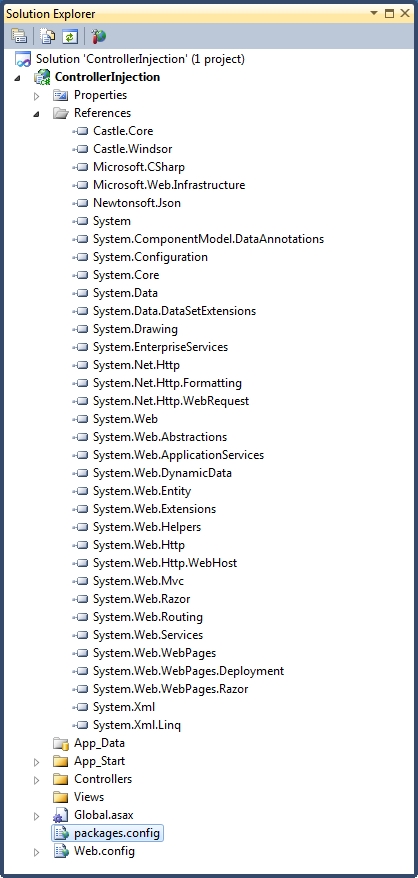
Controller Injection 01

As in my basic dependency injection post I’m going to use Watch and IWatch as my example dependencies:

using System;

namespace ControllerInjection
{
    public interface IWatch
    {
        DateTime GetTime();
    }
}
using System;

namespace ControllerInjection
{
    public class Watch : IWatch
    {
        public DateTime GetTime()
        {
            return DateTime.Now;
        }
    }
}

These have been added to the solution as follows:
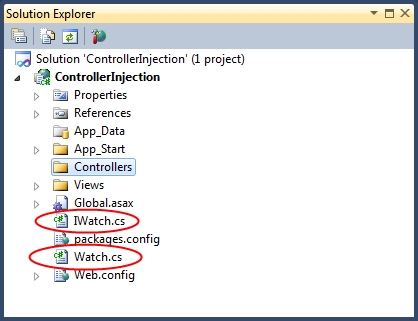
Controller Injection 02

Now I’m going to include a controller called HomeController:
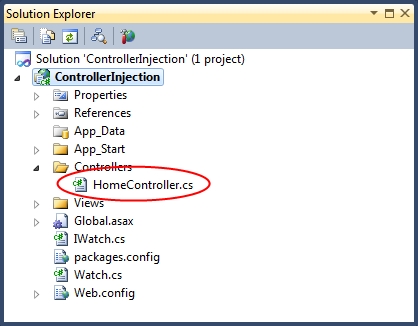
Controller Injection 03

This contains the following code:

using System.Web.Mvc;

namespace ControllerInjection.Controllers
{
    public class HomeController : Controller
    {
        public IWatch Watch { get; set; }

        public ActionResult Index()
        {
            var text = string.Format("The current time on the server is: {0}", Watch.GetTime());
            return Content(text);
        }
    }
}

The key point here is the property called Watch with type IWatch. This is the dependency which will be injected at runtime. To save having to write a new view the Index method returns raw content.

The next component to implement is our custom controller factory. I’ve included this in a folder called DependencyInjection:
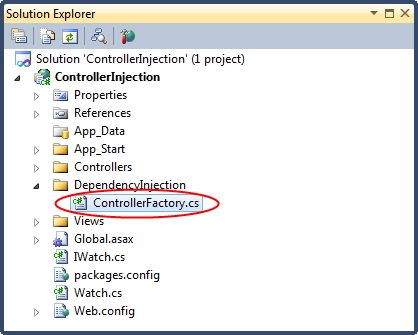
Controller Injection 04

The code inside ControllerFactory is as follows:

using System;
using System.Web;
using System.Web.Mvc;
using System.Web.Routing;
using Castle.MicroKernel;

namespace ControllerInjection.DependencyInjection
{
    public class ControllerFactory : DefaultControllerFactory
    {
        private readonly IKernel kernel;

        public ControllerFactory(IKernel kernel)
        {
            this.kernel = kernel;
        }

        public override void ReleaseController(IController controller)
        {
            kernel.ReleaseComponent(controller);
        }

        protected override IController GetControllerInstance(RequestContext requestContext, Type controllerType)
        {
            if (controllerType == null)
            {
                throw new HttpException(404, string.Format("The controller for path '{0}' could not be found.", requestContext.HttpContext.Request.Path));
            }

            return (IController)kernel.Resolve(controllerType);
        }
    }
}

This class extends the DefaultControllerFactory, overriding the methods to get and release controllers. Note that the Castle Windsor kernel is used to resolve each controller by the type of controller required.

The next thing to add is a dependency injector:
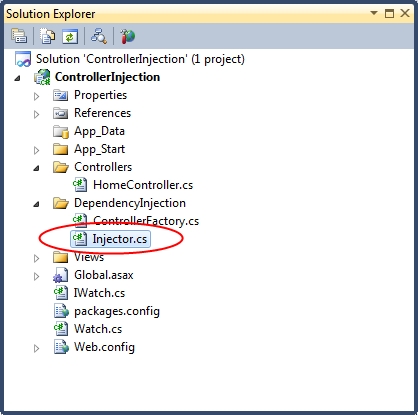
Controller Injection 05

using System.Web.Mvc;
using Castle.MicroKernel.Registration;
using Castle.Windsor;
using Castle.Windsor.Installer;

namespace ControllerInjection.DependencyInjection
{
    public static class Injector
    {
        private static readonly object InstanceLock = new object();

        private static IWindsorContainer instance;

        public static IWindsorContainer Instance
        {
            get
            {
                lock (InstanceLock)
                {
                    return instance ?? (instance = GetInjector());
                }
            }
        }

        private static IWindsorContainer GetInjector()
        {
            var container = new WindsorContainer();

            container.Install(FromAssembly.This());

            RegisterInjector(container);
            RegisterControllers(container); 
            RegisterTimeComponents(container);
            
            return container;
        }

        private static void RegisterTimeComponents(WindsorContainer container)
        {
            container.Register(
                Component.For<IWatch>()
                .ImplementedBy(typeof(Watch))
                .LifeStyle.Singleton);
        }
        
        private static void RegisterControllers(WindsorContainer container)
        {
            var controllerFactory = new ControllerFactory(container.Kernel);
            ControllerBuilder.Current.SetControllerFactory(controllerFactory);

            container.Register(
                    Classes.FromThisAssembly()
                    .BasedOn(typeof(IController))
                    .If(t => t.Name.EndsWith("Controller"))
                    .If(t => t.Namespace.StartsWith("ControllerInjection.Controllers"))
                    .Configure(c => c.LifestylePerWebRequest()));
        }

        private static void RegisterInjector(WindsorContainer container)
        {
            container.Register(
                Component.For<IWindsorContainer>()
                .Instance(container));
        }
    }
}

This is very similar to the injector in my basic dependency example, apart from the addition of a method to register controllers. Crucially, this method also registers our customer controller factory. Note that the lifestyle of each controller is set using LifestylePerWebRequest. This ensures that each new request gets its own controller instance.

As the controller factory is only registered once the injector singleton instance has been instantiated, we need to make sure that we initialise the injector when the application starts up. I’ve done this in the Application_Start method of the Global.asax class:

using System.Web.Http;
using System.Web.Mvc;
using System.Web.Routing;
using ControllerInjection.DependencyInjection;

namespace ControllerInjection
{
    public class MvcApplication : System.Web.HttpApplication
    {
        protected void Application_Start()
        {
            // Ensure the dependency injection has been initalised:
            var injector = Injector.Instance;

            /* Normally you would do something with the injector here, like writing an entry to 
             * the log stating that the application had started. */

            AreaRegistration.RegisterAllAreas();

            WebApiConfig.Register(GlobalConfiguration.Configuration);
            FilterConfig.RegisterGlobalFilters(GlobalFilters.Filters);
            RouteConfig.RegisterRoutes(RouteTable.Routes);
        }
    }
}

In practice this doesn’t prove to be a problem as most applications will involve some kind of logging tool (such as Log4Net) which will be obtained from the dependency injection engine. It is usual to log the fact that the application starts, so the injector gets instantiated anyway.

Running the code results in the following string being written to the screen as expected:

The current time on the server is: 11/04/2013 21:59:36

Basic dependency injection with Castle Windsor

I’ve already blogged about dependency injection using Castle Windsor in a previous article:

Registering many like types in Castle Windsor

…without giving any of the details around how to set up dependency injection in the first place. This post aims to put that right by demonstrating a basic “Hello World” for those new to dependency injection with Castle Windsor. My example application will simply write the current date and time to the screen using a console application.

I’ve created a solution called BasicDependencyInjection and added a console application with the same name. Don’t forget to change the client profile in your console application as described in a previous post.

I’ve used NuGet to add Castle Windsor to the console application.

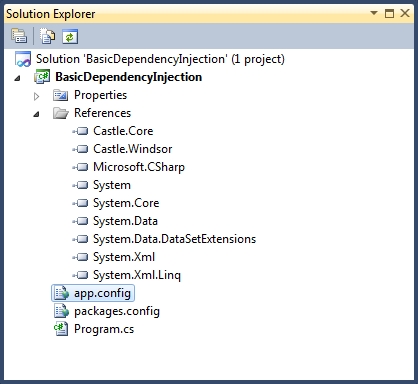
My starting solution now looks like this:

Basic DI 01

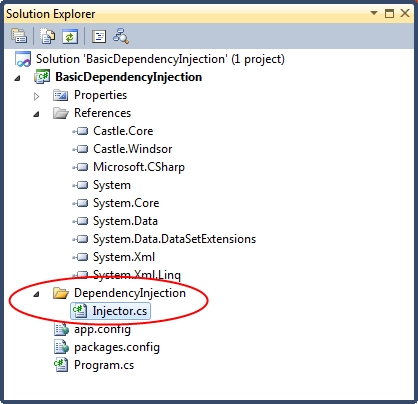
To this I’ve added a class called Injector in a folder called DependencyInjection:

Basic DI 02

The code in this file is as follows:

using Castle.Windsor;
using Castle.Windsor.Installer;
using Castle.MicroKernel.Registration;

namespace BasicDependencyInjection.DependencyInjection
{
    public static class Injector
    {
        private static readonly object InstanceLock = new object();

        private static IWindsorContainer instance;

        public static IWindsorContainer Instance
        {
            get
            {
                lock (InstanceLock)
                {
                    return instance ?? (instance = GetInjector());
                }
            }
        }

        private static IWindsorContainer GetInjector()
        {
            var container = new WindsorContainer();

            container.Install(FromAssembly.This());

            RegisterInjector(container);

            /* Register more components here */
            
            return container;
        }
        
        private static void RegisterInjector(WindsorContainer container)
        {
            container.Register(
                Component.For<IWindsorContainer>()
                .Instance(container));
        }
    }
}

This is using a take on the singleton pattern to ensure there can only ever be one injector in the application. Note that the class also uses simple thread-locking to ensure that the singleton pattern isn’t bypassed by multiple threads requesting an instance at the same time.

Aside: These days the singleton pattern is considered bad practice. I believe the reason for this is that anything that would traditionally have been created using this pattern should now be injected. However, there is no way to “inject the injector” so I think use of the singleton pattern for this specific task is acceptible. I’d be interested to hear other opinions on this.

At the moment the only thing the injector can resolve is itself. We’ll add to the injector later on in the example. Next we need to create some test dependencies to inject.

When doing demonstrations using dependency injection I like to involve the current date and time as this is a classic textbook example of a dependency, and one that is often overlooked. If you’re hardcoding DateTime.Now statements throughout your code you haven’t removed all your dependencies! Other than making code loosely coupled one of the main advantages of dependency injection is that code is more testable. If you hardcode DateTime.Now you make unit testing much harder as test data needs to be generated each time to reflect the date on which the tests are being ran.

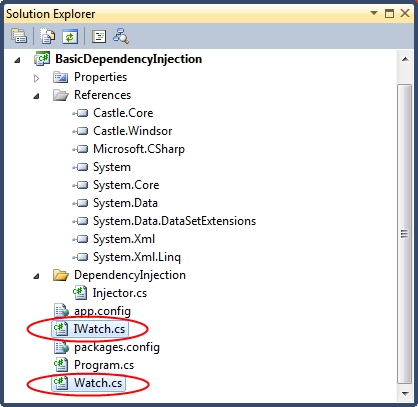
For dependency injection to work we need a class and an interface for each dependency, so I’m going to add Watch and IWatch to the application as follows:

Basic DI 03

These contain the following simple code:

using System;

namespace BasicDependencyInjection
{
    public interface IWatch
    {
        DateTime GetTime();
    }
}
using System;

namespace BasicDependencyInjection
{
    public class Watch : IWatch
    {
        public DateTime GetTime()
        {
            return DateTime.Now;
        }
    }
}

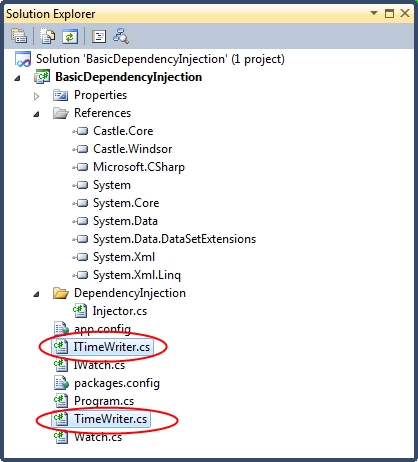
I’m also going to include a dependency to actually write the date and time to the screen, using ITimeWriter and TimeWriter:

Basic DI 04

…which are as follows:

namespace BasicDependencyInjection
{
    public interface ITimeWriter
    {
        void WriteTime();
    }
}
using System;

namespace BasicDependencyInjection
{
    public class TimeWriter : ITimeWriter
    {
        public IWatch Watch { get; set; }

        public void WriteTime()
        {
            Console.WriteLine("The current time is: {0}", Watch.GetTime());
        }
    }
}

The TimeWriter class has a property of Type IWatch called Watch, which doesn’t appear to be assigned a value anywhere in the code. One of the most confusing things for developers new to dependency injection is where these properties actually get set. When debugging through existing codebases with dependency injection enabled properties such as these do have values assigned but the assignment cannot be found anywhere. It’s like magic! The thing to remember is that when a reference is resolved using a dependency injecton framework, all contructor arguments and properties that have an interface that the injector knows about are assigned the object associated with the interface.

Now that dependencies have been added, we need to make sure the injector knows about them. I’ve updated the injector class as follows:

using Castle.Windsor;
using Castle.Windsor.Installer;
using Castle.MicroKernel.Registration;

namespace BasicDependencyInjection.DependencyInjection
{
    public static class Injector
    {
        private static readonly object InstanceLock = new object();

        private static IWindsorContainer instance;

        public static IWindsorContainer Instance
        {
            get
            {
                lock (InstanceLock)
                {
                    return instance ?? (instance = GetInjector());
                }
            }
        }

        private static IWindsorContainer GetInjector()
        {
            var container = new WindsorContainer();

            container.Install(FromAssembly.This());

            RegisterInjector(container);
            RegisterTimeComponents(container);
            
            return container;
        }
        
        private static void RegisterTimeComponents(WindsorContainer container)
        {
            container.Register(
                   Component.For()
                   .ImplementedBy(typeof(Watch))
                   .LifeStyle.Singleton);

            container.Register(
                   Component.For()
                   .ImplementedBy(typeof(TimeWriter))
                   .LifeStyle.Singleton);
        }

        private static void RegisterInjector(WindsorContainer container)
        {
            container.Register(
                Component.For<IWindsorContainer>()
                .Instance(container));
        }
    }
}

This now maps IWatch to Watch and ITimeWriter to TimeWriter.

All that remains is to include some code in the program:

using System;
using BasicDependencyInjection.DependencyInjection;

namespace BasicDependencyInjection
{
    public static class Program
    {
        public static void Main()
        {
            var timePrinter = Injector.Instance.Resolve();
            timePrinter.WriteTime();

            Console.WriteLine();
            Console.WriteLine("Press RETURN to exit...");
            Console.ReadLine();
        }
    }
}

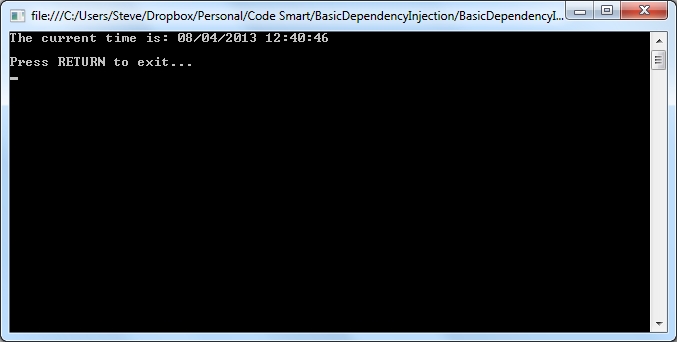
…and run the thing. Which yields:

Basic DI 05

…as expected.

That concludes my dependency injection “Hello World”.