Prevent malicious image uploads

If you allow users to upload images to your site, you may be opening up your site to malicious use. This is because particularly cunning hackers can hide commands to do just about anything in the data that makes up the image.

For a great example of an infected image file, see the following page:

http://www.eicar.org/86-0-Intended-use.html

Note that you’ll need to disable your anti-virus if you want to create this file on your computer.

If you allow users to upload this file, it will produce some interesting results!

To prevent the vulnerability (at least when using C#) you simply need to try and load the image data into an Image object. This will throw an exception if the image contains anything nasty. Here is an example:

var image = Image.FromStream(imageDataStream);
using (var memoryStream = new MemoryStream())
{
    image.Save(memoryStream, ImageFormat.Png);
}

Note that you’ll need to load the uploaded data into a stream (imageDataStream in the example above) to get this to work.

Using the Return key with Back and Next buttons on web-sites

When it boils down to it, most sites on the web are just gloried data crunchers. Users enter information, which the system churns up and splits out again at some point in the future, potentially to a different user.

If a site requires a lot of information, it is common to see multistage wizards, with each stage asking for a small portion of the information. Each stage usually has a Back button and a Next button. Convention and common sense dictate that the Back button should be on the left, and the Next button on the right as in the following example:

Type something here:
… and here:

NB: The onclick events return false to prevent the page from actually submitting.

This all seems to works fantastically, and even uses tabindex to ensure that the user tabs onto the Next button before the Back button… until someone comes along that prefers to use the Return key to submit the form, instead of using the mouse or tabbing to the Next button. In this case, the Return key will call the first submit button it can find, which in this case is the Back button. This is not the expected behaviour! Put the cursor in one of the input fields and click Return to see this in action.

One solution to correct this would be to use floats and/or JavaScript to try and reverse the order the buttons are displayed in while still having the Next button placed highest in the HTML to ensure that it would respond to the Return key. However, if a user disables CSS and/or JavaScript this solution will fail. A simpler option is to create a hidden submit button as the first element within the form, which performs the desired Return key operation. The order of any other (visible) buttons on the form is then irrelevant.

The following form demonstrates this:

Type something here:
… and here:

Again, put the cursor in one of the input fields and click Return to see this in action. The only downside to this is that the user will see another submit button if they disable CSS, but in most cases I think it is still the best solution.

Basic fluent interface

Fluent interfaces seem to be everywhere these days, probably because they can be used to produce highly readable code. They use method cascading/chaining to achieve this, whereby method calls are made one after another on the same object reference.

Good examples are the LINQ component in .NET and Fluent NHibernate, obviously!

Here is a really simple example to demonstrate how you would go about writing a fluent API, in which values can be added to or subtracted from a numeric value. This is encapsulated in a Number class:

public class Number
{
    private int currentValue;

    public Number(int value = 0)
    {
        currentValue = value;
    }

    public int Value
    {
        get
        {
            return currentValue;
        }
    }

    public Number Add(int value)
    {
        currentValue += value;
        return this;
    }

    public Number Subtract(int value)
    {
        currentValue -= value;
        return this;
    }
}

Note that each of the chained methods returns the current instance, via the this keyword.

The Number class can be used as follows:

public static class Program
{
    public static void Main()
    {
        var number = new Number();
        
        number.Add(1).Add(2).Add(3);
        Console.WriteLine(number.Value);

        number.Subtract(4).Subtract(1).Add(2);
        Console.WriteLine(number.Value);

        Console.ReadLine();
    }
}

As an aside, adding the ability to multiply and divide would significantly increase the complexity of this class, since the order of operations would need to be taken into account.

However, hopefully my example shows how fluent APIs are put together.

Simple trick to help prevent click-jacking

Click-jacking is a technique used by hackers to get you to interact with websites without your consent or knowledge. An example would be to get you to click a Like button on a Facebook page without you realising it. The trick with click-jacking is misdirection. One way to achieve this is to show you a friendly looking site, preferably a site which you are already familiar with, but where the buttons perform actions other than those you expect. This can be achieved by hosting the friendly site in an iframe, with fake buttons floated over the top of the real buttons. These fake buttons can then perform unintended actions, such as submitting a Like to Facebook.

You can test whether your website is vulnerable using the following HTML snippet:

<html>
<head>
<title>Clickjack test page</title>
</head>
<body>
<p>Website is vulnerable to clickjacking!</p>
<iframe src="http://www.mywebsite.com" width="1000" height="1000"></iframe>
</body>
</html>

If you can see the text Website is vulnerable to clickjacking! when you look at the code in a browser your site could be used as a target for click-jacking.

A simple way to prevent this kind of attack is to include the following JavaScript at the top of your site:

<script type="text/javascript">
// Prevent the page from being vulnerable to click jacking
if (self == top) {
var theBody = document.getElementsByTagName('body')[0];
theBody.style.display = "block";
} else {
top.location = self.location;
}
</script>

The JavaScript checks to see if the containing page is the top-most entity in the HTML served to the user. If not, then the whole browser is re-directed to the address of the containing page, thus removing the iframe.

Obviously this won’t work if users don’t have JavaScript enabled, but for the sake of a few lines of trivial JavaScript it’s worth adding this to your site.

Classic web-page layout with HTML and CSS

I met up with a great friend of mine the other week for our monthly “tech-talk” session, in which we share things we’ve learned or heard about in the IT world. We hold these sessions in order to give ourselves the illusion that we are actually managing to keep up with the ever-changing world of IT, and of course to enjoy some good banter and real ale.

We started talking about the layout of web-pages, and why using tables for anything other than an actual table is a bad idea. (If you don’t know why it’s a bad idea, ask someone with a visual impairment for their thoughts on the matter…)

I promised to share with my mate how I would go about creating a classic header/columns/footer web-site using only divs and CSS. Here is the result:

<html>
    <head>
        <title>Class Page Layout</title>
        <style type="text/css">
            body {
                font-family:'Courier New';
                font-size:1em;
                background-color:gray;
            }

            ul {
                margin:0px;
            }

            #container {
                width:800px;
                margin-left:auto;
                margin-right:auto;
            }

            #header {
                height:50px;
                padding:10px;
                margin:0px;
                background-color:#FFFF66;
            }

            #mainContent {
                height:400px;
            }

            #leftSection {
                background-color:#99FFFF;
                width:25%;
                float:left;
                height:100%;
            }

            #centreSection {
                background-color:#00FF00;
                width:50%;
                float:left;
                height:100%;
            }

            #rightSection {
                background-color:#99FFFF;
                width:25%;
                float:left;
                height:100%;
            }

            #footer {
                clear:both;
                height:50px;
                padding:10px;
                margin:0px;
                background-color:#FFFF66;
            }

            #footerLeft {
                float:left;
            }

            #footerRight  {
                float:right;
            }
        </style>
    </head>
    <body>
        <div id="container">
            <div id="header">Header</div>
            <div id="mainContent">
                <div id="leftSection">
                    <ul>
                        <li>One</li>
                        <li>Two</li>
                    </ul>
                </div>
                <div id="centreSection">
                    <h1>Heading</h1>
                    <div>Lorem ipsum dolor sit amet, consectetur adipisicing elit, sed do eiusmod tempor incididunt ut labore et dolore magna aliqua. Ut enim ad minim veniam, quis nostrud exercitation ullamco laboris nisi ut aliquip ex ea commodo consequat. Duis aute irure dolor in reprehenderit in voluptate velit esse cillum dolore eu fugiat nulla pariatur. Excepteur sint occaecat cupidatat non proident, sunt in culpa qui officia deserunt mollit anim id est laborum.</div>
                </div>
                <div id="rightSection">
                    <ul>
                        <li>One</li>
                        <li>Two</li>
                    </ul>
                </div>
            </div>            
            <div id="footer">
                <div id="footerLeft">Footer</div>
                <div id="footerRight">Copyleft 2013</div>
            </div>
        </div>
    </body>
</html>

You can view the actual page here.

Although you’d probably use something like Bootstrap to achieve this kind layout these days, especially if you wanted it to render nicely on mobiles, it’s good to be able to build this kind of layout from scratch as well. The secret to getting it working is in the floats, and if you use the Web Developer toolbar by Chris Pederick to turn off CSS as I mentioned in a recent post about Firefox add-ons, you can see that the underlying HTML is a simple set of divs, one after the other.

I’ve tested this layout in the following browsers and all looks good:

  • Firefox
  • Chrome
  • IE10
  • IE9
  • IE8
  • IE7
  • Opera
  • Safari (for Windows)

NHibernate NullableDateTime custom type

NHibernate doesn’t support mappings for nullable DateTime types by default. Fortunately, this is easy to implement using the IUserType interface. To demonstrate this, create a new Console Application project and add FluentNHibernate using NuGet. Then add the following class:

using System;
using System.Data;
using NHibernate;
using NHibernate.SqlTypes;
using NHibernate.UserTypes;

namespace UserTypes
{
    /// <summary>
    /// Type to allow NHibernate to persist DateTime? objects
    /// </summary>
    public class NullableDateTimeType : IUserType
    {
        /// <summary>
        /// Gets a value indicating whether the value is mutable
        /// </summary>
        public bool IsMutable
        {
            get
            {
                // This item is immutable:
                return false;
            }
        }

        /// <summary>
        /// Gets the type returned by NullSafeGet()
        /// </summary>
        public Type ReturnedType
        {
            get
            {
                return typeof(DateTime?);
            }
        }

        /// <summary>
        /// Gets the SQL types for the columns mapped by this type. 
        /// </summary>
        public SqlType[] SqlTypes
        {
            get
            {
                return new[]
                {
                    new SqlType(DbType.DateTime)
                };
            }
        }

        /// <summary>
        /// Reconstruct an object from the cacheable representation. At the very least this method should perform a deep copy if the type is mutable.
        /// </summary>
        /// <param name="cached">The cached object</param>
        /// <param name="owner">The owner object</param>
        /// <returns>The assemled object</returns>
        public object Assemble(object cached, object owner)
        {
            // Used for caching. As our object is immutable we can return as is:
            return cached;
        }

        /// <summary>
        /// Return a deep copy of the persistent state, stopping at entities and at collections. 
        /// </summary>
        /// <param name="value">The item to copy</param>
        /// <returns>The copied item</returns>
        public object DeepCopy(object value)
        {
            // We deep copy the item by creating a new instance with the same contents.
            // Note that this happens for free with value types because of the way 
            // that method parameters work:
            if (value == null)
            {
                return null;
            }

            return value as DateTime?;
        }

        /// <summary>
        /// Transform the object into its cacheable representation. At the very least this method should perform a deep copy 
        /// if the type is mutable. That may not be enough for some implementations, however; for example, associations must 
        /// be cached as identifier values.
        /// </summary>
        /// <param name="value">The cached object</param>
        /// <returns>The dassassemled object</returns>
        public object Disassemble(object value)
        {
            // Used for caching. As our object is immutable we can return as is:
            return value;
        }

        /// <summary>
        /// Compare two instances of the class mapped by this type for persistent "equality" ie. equality of persistent state 
        /// </summary>
        /// <param name="x">The first item</param>
        /// <param name="y">The second item</param>
        /// <returns>A value indicating whether the items are equal</returns>
        public new bool Equals(object x, object y)
        {
            if (x == null && y == null)
            {
                return true;
            }

            if (x == null)
            {
                return false;
            }

            return x.Equals(y);
        }

        /// <summary>
        /// Get a hashcode for the instance, consistent with persistence "equality" 
        /// </summary>
        /// <param name="x">The value to get the hash code for</param>
        /// <returns>The hash code</returns>
        public int GetHashCode(object x)
        {
            if (x == null)
            {
                return 0;
            }

            return x.GetHashCode();
        }

        /// <summary>
        /// Retrieve an instance of the mapped class from a resultset. Implementors should handle possibility of null values. 
        /// </summary>
        /// <param name="rs">The reader</param>
        /// <param name="names">The item names</param>
        /// <param name="owner">The owner object</param>
        /// <returns>The object requested</returns>
        public object NullSafeGet(IDataReader rs, string[] names, object owner)
        {
            // We get the DateTime from the database using the NullSafeGet used to get strings from NHibernateUtil:
            return NHibernateUtil.DateTime.NullSafeGet(rs, names[0]) as DateTime?;
        }

        /// <summary>
        /// Write an instance of the mapped class to a prepared statement. Implementors should handle possibility of null values. A multi-column type should be written to parameters starting from index. 
        /// </summary>
        /// <param name="cmd">The command</param>
        /// <param name="value">The value to use</param>
        /// <param name="index">The index to set</param>
        public void NullSafeSet(IDbCommand cmd, object value, int index)
        {
            // Convert to the correct type and set:
            var dateTimeValue = value as DateTime?;

            if (dateTimeValue == null)
            {
                NHibernateUtil.DateTime.NullSafeSet(cmd, null, index);
            }
            else
            {
                NHibernateUtil.DateTime.NullSafeSet(cmd, dateTimeValue.Value, index);
            }
        }

        /// <summary>
        /// During merge, replace the existing (target) value in the entity we are merging to with a new (original) 
        /// value from the detached entity we are merging. For immutable objects, or null values, it is safe to 
        /// simply return the first parameter. For mutable objects, it is safe to return a copy of the first parameter. 
        /// For objects with component values, it might make sense to recursively replace component values. 
        /// </summary>
        /// <param name="original">The original value</param>
        /// <param name="target">The target value</param>
        /// <param name="owner">The owner object</param>
        /// <returns>The replacement object</returns>
        public object Replace(object original, object target, object owner)
        {
            // As our object is immutable we can just return the original  
            return original;
        }
    }
}

This class is responsible for telling NHibernate how to save and retrieve nullable DateTime values. The following demonstrates how this class can be used.

Given a class with a nullable DateTime property:

using System;

namespace UserTypes
{
    public class Student
    {
        public int Id { get; set; }
        public string FirstName { get; set; }
        public string LastName { get; set; }
        public DateTime? GraduationDate { get; set; }
    }
}

…the mapping would be as follows:

using FluentNHibernate.Mapping;
using UserTypes;

public class StudentMapping : ClassMap<Student>
{
    public StudentMapping()
    {
        Not.LazyLoad();
        Id(x => x.Id).GeneratedBy.Identity();
        Map(x => x.FirstName).Length(20).Not.Nullable();
        Map(x => x.LastName).Length(20).Not.Nullable();
        Map(x => x.GraduationDate).Nullable().CustomType(x => typeof(NullableDateTimeType));
    }
}

This can be tested by adding the following code to the Program class:

using System;
using FluentNHibernate.Cfg;
using FluentNHibernate.Cfg.Db;
using NHibernate.Cfg;
using NHibernate.Tool.hbm2ddl;

namespace UserTypes
{
    public static class Program
    {
        public static void Main()
        {
            var connectionString = "Data Source=(local);Initial Catalog=StudentTest;Integrated Security=True;Pooling=False";

            var sessionFactory = Fluently.Configure()
                .Database(MsSqlConfiguration.MsSql2008.ConnectionString(connectionString).ShowSql())
                .ExposeConfiguration(BuildSchema)
                .Mappings(x => x.FluentMappings.AddFromAssemblyOf<Student>())
                .BuildSessionFactory();

            // Create the session:
            using (var session = sessionFactory.OpenSession())
            {
                session.SaveOrUpdate(new Student { FirstName = "Not", LastName = "Graduated" });
                session.SaveOrUpdate(new Student { FirstName = "Already", LastName = "Graduated", GraduationDate = new DateTime(2000, 1, 1) });
            }

            using (var session = sessionFactory.OpenSession())
            {
                var students = session.QueryOver<Student>().List();
                foreach (var student in students)
                {
                    Console.WriteLine("{0} {1} {2}", student.FirstName, student.LastName, student.GraduationDate);
                }
            }

            Console.ReadLine();
        }

        private static void BuildSchema(Configuration configuration)
        {
            new SchemaExport(configuration).Create(false, true);
        }
    }
}

Note that the code above assumes there is a local instance of SQL Server running, with a database called StudentTest accessible using integrated authentication.

Running the code creates the following table, which includes a DateTime field that accepts null values as required:

NHibernateNullableDateTime01

…inserts the following data:

NHibernateNullableDateTime02

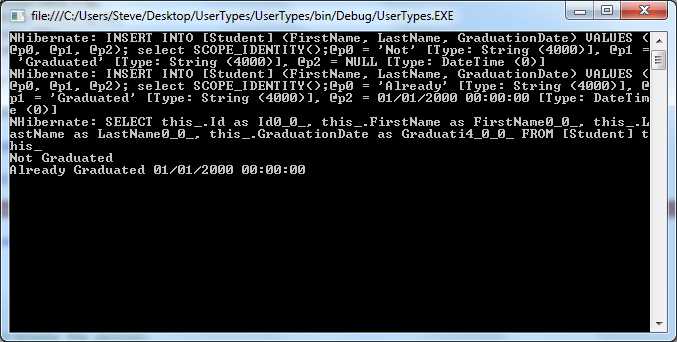
…and outputs the following:

NHibernateNullableDateTime03

This proves that the mapping can be used to store and retrieve null and non-null DateTime values as required.

Encapsulated and strongly-typed access to .NET configuration files with dependency injection

This article builds on a previous post entitled Encapsulated and strongly-typed access to .NET configuration files. In this example I’ll be adding dependency injection using Castle Windsor.

As per my previous post, the code for this example is in GitHub, here:

https://github.com/stevebarker333/Injected-Encapsulated-Strongly-Typed-Configuration-Files

In this post I’ll assume that you’ve read the previous post, and that you have the existing code base as a starting point. The first step then, is to add Castle Windsor to the project using NuGet. This adds references to each project as follows:

ConfigurationDependencyInjection01

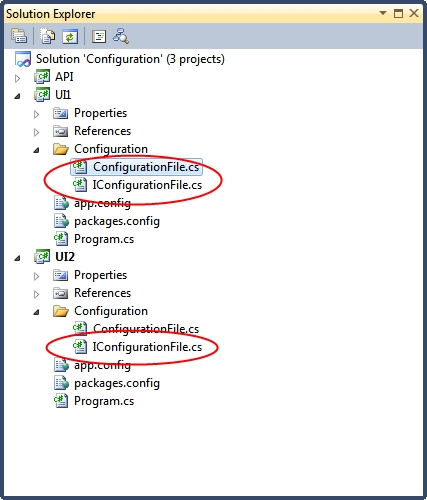
Since dependency injection works by resolving interfaces to types, each encapsulated ConfigurationFile will need to be given an interface by adding IConfigurationFile to each of the two UI projects:

ConfigurationDependencyInjection02

These new interfaces need contain only the properties that are unique to each UI. Access to core properties is achieved via the ICoreConfiguration, as follows:

UI1.Configuration.ConfigurationFile:

using System;
using API.Configuration;

namespace UI1.Configuration
{
    public interface IConfigurationFile : ICoreConfiguration
    {
        string UI1String { get; }
        int UI1Int { get; }
        Uri UI1Uri { get; }
    }
}

UI2.Configuration.ConfigurationFile

using System;
using API.Configuration;

namespace UI2.Configuration
{
    public interface IConfigurationFile : ICoreConfiguration
    {
        string UI2String { get; }
        int UI2Int { get; }
        Uri UI2Uri { get; }
    }
}

The definitions of the ConfigurationFile classes in each UI project need to be adjusted to include these new interfaces, as follows:

public class ConfigurationFile : 
    API.Configuration.ConfigurationFile, IConfigurationFile, 
    API.Configuration.ICoreConfiguration
{
    ...
}

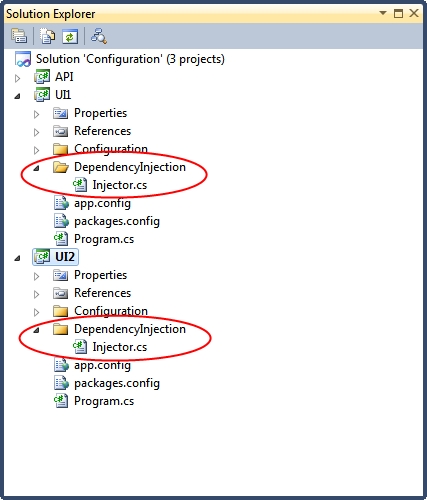
Each UI then gets its own Injector class:

ConfigurationDependencyInjection03

…containing the following code:

UI1.DependencyInjection.Injector:

using API.Configuration;
using Castle.MicroKernel.Registration;
using Castle.Windsor;
using Castle.Windsor.Installer;
using UI1.Configuration;
using API;

namespace UI1.DependencyInjection
{
    public static class Injector
    {
        private static readonly object InstanceLock = new object();

        private static IWindsorContainer instance;

        public static IWindsorContainer Instance
        {
            get
            {
                lock (InstanceLock)
                {
                    return instance ?? (instance = GetInjector());
                }
            }
        }

        private static IWindsorContainer GetInjector()
        {
            var container = new WindsorContainer();

            container.Install(FromAssembly.This());

            RegisterInjector(container);
            RegisterConfiguration(container);
            RegisterWidget(container);

            return container;
        }

        private static void RegisterInjector(WindsorContainer container)
        {
            container.Register(
                Component.For<IWindsorContainer>()
                .Instance(container));
        }

        private static void RegisterConfiguration(WindsorContainer container)
        {
            container.Register(
                Component.For<IConfigurationFile, ICoreConfiguration>()
                .ImplementedBy(typeof(Configuration.ConfigurationFile))
                .LifeStyle.Singleton);
        }

        private static void RegisterWidget(WindsorContainer container)
        {
            container.Register(
                Component.For<IWidget>()
                .ImplementedBy(typeof(Widget))
                .LifeStyle.Singleton);
        }
    }
}

UI2.DependencyInjection.Injector:

using API.Configuration;
using Castle.MicroKernel.Registration;
using Castle.Windsor;
using Castle.Windsor.Installer;
using UI2.Configuration;
using API;

namespace UI2.DependencyInjection
{
    public static class Injector
    {
        private static readonly object InstanceLock = new object();

        private static IWindsorContainer instance;
        
        public static IWindsorContainer Instance
        {
            get
            {
                lock (InstanceLock)
                {
                    return instance ?? (instance = GetInjector());
                }
            }
        }

        private static IWindsorContainer GetInjector()
        {
            var container = new WindsorContainer();

            container.Install(FromAssembly.This());

            RegisterInjector(container);
            RegisterConfiguration(container);
            RegisterWidget(container);

            return container;
        }

        private static void RegisterInjector(WindsorContainer container)
        {
            container.Register(
                Component.For<IWindsorContainer>()
                .Instance(container));
        }

        private static void RegisterConfiguration(WindsorContainer container)
        {
            container.Register(
                Component.For<IConfigurationFile, ICoreConfiguration>()
                .ImplementedBy(typeof(Configuration.ConfigurationFile))
                .LifeStyle.Singleton);
        }

        private static void RegisterWidget(WindsorContainer container)
        {
            container.Register(
                Component.For<IWidget>()
                .ImplementedBy(typeof(Widget))
                .LifeStyle.Singleton);
        }
    }
}

Note that the technique described in my post entitled Allowing Castle Windsor to resolve two interfaces to the same instance allows the ConfigurationFile type to be accessed using both the API interface ICoreConfiguration and each of the UI interfaces, IConfigurationFile. Note also that the Widget is registered with the dependency injector. This requires some small changes to the Widget and the creation of an interface, IWidget:

using System;
using API.Configuration;

namespace API
{
    public class Widget : IWidget
    {
        public ICoreConfiguration Configuration { get; set; }

        public void DoSomething()
        {
            Console.WriteLine(Configuration.CoreString);
            Console.WriteLine(Configuration.CoreInt);
            Console.WriteLine(Configuration.CoreUri);
        }
    }
}
namespace API
{
    public interface IWidget
    {
        void DoSomething();
    }
}

Finally, we change the Program classes in the console applications to use the injector, as follows:

using System;
using UI1.Configuration;
using API;
using UI1.DependencyInjection;

namespace UI1
{
    public static class Program
    {
        public static void Main()
        {
            var configurationFile = Injector.Instance.Resolve<IConfigurationFile>();

            Console.WriteLine(configurationFile.UI1String);
            Console.WriteLine(configurationFile.UI1Int);
            Console.WriteLine(configurationFile.UI1Uri);

            var widget = Injector.Instance.Resolve<IWidget>();
            widget.DoSomething();

            Console.ReadLine();
        }
    }
}
using System;
using UI2.Configuration;
using API;
using UI2.DependencyInjection;

namespace UI2
{
    public static class Program
    {
        public static void Main()
        {
            var configurationFile = Injector.Instance.Resolve<IConfigurationFile>();

            Console.WriteLine(configurationFile.UI2String);
            Console.WriteLine(configurationFile.UI2Int);
            Console.WriteLine(configurationFile.UI2Uri);

            var widget = Injector.Instance.Resolve<IWidget>();
            widget.DoSomething();

            Console.ReadLine();
        }
    }
}

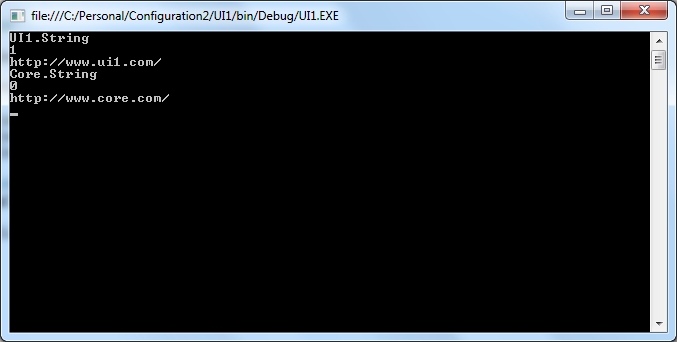
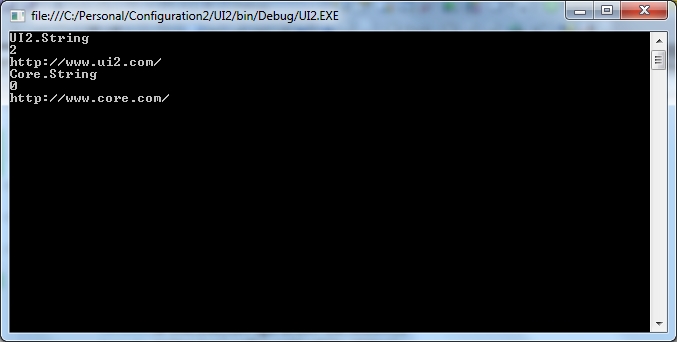
Since the Widget class contains a property called Configuration of type ICoreConfiguration, the dependency injection engine can simply load the correct configuration file object in at run-time, and everything “just works”. Running the application gives exactly the same outputs as the previous non-injected example which means the spirit of the original code has been kept the same:

ConfigurationDependencyInjection04

ConfigurationDependencyInjection05

So, as always, adding dependency injection involves a bit more work, but the benefits (non-brittle, highly testable code to name just two) far outweigh the extra time required.

ASP.NET MVC controller dependency injection using Castle Windsor

In a previous post I looked at basic dependency injection. In this post I demonstrated dependency injection using a simple example in which all functionality in the application was wrapped up in a single class (TimeWriter) with an associated interface (ITimeWriter). The application uses the dependency injection framework to get an instance of this class by its interface. In the process of doing this, all dependencies within the class are also satisfied. The application can then run as normal and write the date and time to the screen.

This approach is fine for console applications as they usually only have one entry point (the Main method) and from there we have complete control over the all code that runs once the application has started. Including dependency injection in ASP.NET MVC web-applications isn’t so straightforward as by default we don’t have control over how code runs right from the start of a user request. The MVC routing engine interprets the request, maps this to a controller, instantiates the controller (using the default controller factory) and calls the correct method on the controller instance. We then get to steer the code execution within the controller method. From a programming perspective, MVC development is like writting an application with multiple entry points contained in multiple controllers.

As we don’t get to instantiate the controller for ourselves there is no obvious way to include dependency injection, unless we write a class and interface for every controller operation and register them with the dependency injection engine in an analogous fashion to the console application example. This would work but it’s clearly not a good idea!

Fortunately ASP.NET MVC allows us to specify custom controller factories, and Castle Windsor includes classes to make it very simple to include dependency injection in this customisation process. Once configured, you can include dependencies as properties in your controllers which, along with the controllers themselves, are resolved by Castle Windsor each time a user request is received.

This time I’m starting with an Empty ASP.NET MVC application using the Razor view engine. The application and the containing solution are called ControllerInjection. Once created, I use NuGet to add a reference to Castle Windsor. My starting point thus looks like this:
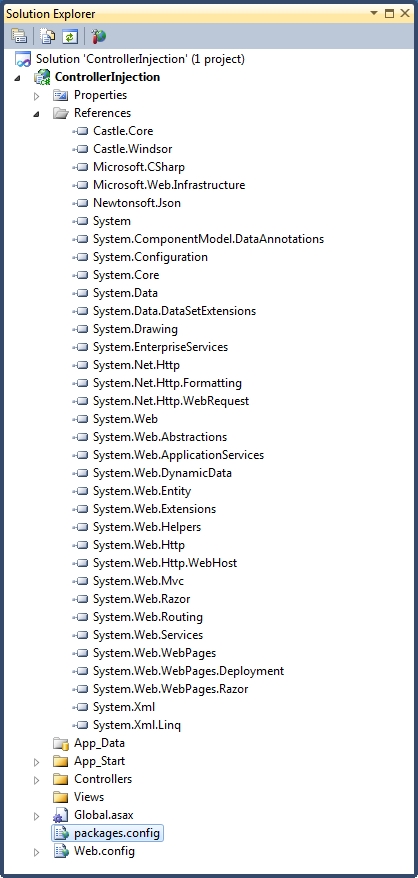
Controller Injection 01

As in my basic dependency injection post I’m going to use Watch and IWatch as my example dependencies:

using System;

namespace ControllerInjection
{
    public interface IWatch
    {
        DateTime GetTime();
    }
}
using System;

namespace ControllerInjection
{
    public class Watch : IWatch
    {
        public DateTime GetTime()
        {
            return DateTime.Now;
        }
    }
}

These have been added to the solution as follows:
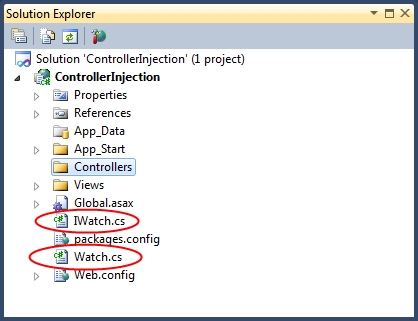
Controller Injection 02

Now I’m going to include a controller called HomeController:
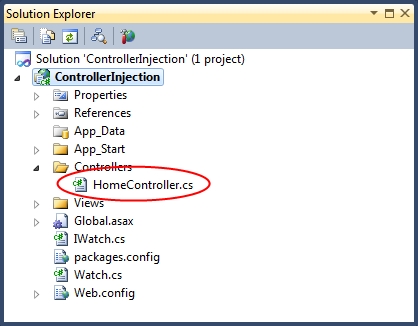
Controller Injection 03

This contains the following code:

using System.Web.Mvc;

namespace ControllerInjection.Controllers
{
    public class HomeController : Controller
    {
        public IWatch Watch { get; set; }

        public ActionResult Index()
        {
            var text = string.Format("The current time on the server is: {0}", Watch.GetTime());
            return Content(text);
        }
    }
}

The key point here is the property called Watch with type IWatch. This is the dependency which will be injected at runtime. To save having to write a new view the Index method returns raw content.

The next component to implement is our custom controller factory. I’ve included this in a folder called DependencyInjection:
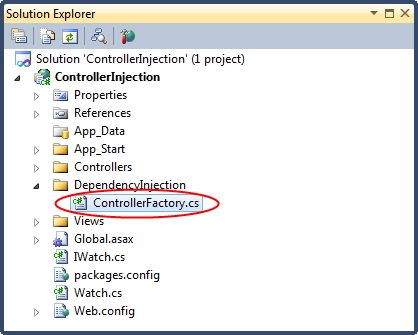
Controller Injection 04

The code inside ControllerFactory is as follows:

using System;
using System.Web;
using System.Web.Mvc;
using System.Web.Routing;
using Castle.MicroKernel;

namespace ControllerInjection.DependencyInjection
{
    public class ControllerFactory : DefaultControllerFactory
    {
        private readonly IKernel kernel;

        public ControllerFactory(IKernel kernel)
        {
            this.kernel = kernel;
        }

        public override void ReleaseController(IController controller)
        {
            kernel.ReleaseComponent(controller);
        }

        protected override IController GetControllerInstance(RequestContext requestContext, Type controllerType)
        {
            if (controllerType == null)
            {
                throw new HttpException(404, string.Format("The controller for path '{0}' could not be found.", requestContext.HttpContext.Request.Path));
            }

            return (IController)kernel.Resolve(controllerType);
        }
    }
}

This class extends the DefaultControllerFactory, overriding the methods to get and release controllers. Note that the Castle Windsor kernel is used to resolve each controller by the type of controller required.

The next thing to add is a dependency injector:
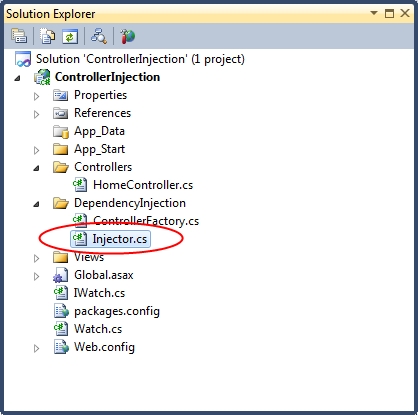
Controller Injection 05

using System.Web.Mvc;
using Castle.MicroKernel.Registration;
using Castle.Windsor;
using Castle.Windsor.Installer;

namespace ControllerInjection.DependencyInjection
{
    public static class Injector
    {
        private static readonly object InstanceLock = new object();

        private static IWindsorContainer instance;

        public static IWindsorContainer Instance
        {
            get
            {
                lock (InstanceLock)
                {
                    return instance ?? (instance = GetInjector());
                }
            }
        }

        private static IWindsorContainer GetInjector()
        {
            var container = new WindsorContainer();

            container.Install(FromAssembly.This());

            RegisterInjector(container);
            RegisterControllers(container); 
            RegisterTimeComponents(container);
            
            return container;
        }

        private static void RegisterTimeComponents(WindsorContainer container)
        {
            container.Register(
                Component.For<IWatch>()
                .ImplementedBy(typeof(Watch))
                .LifeStyle.Singleton);
        }
        
        private static void RegisterControllers(WindsorContainer container)
        {
            var controllerFactory = new ControllerFactory(container.Kernel);
            ControllerBuilder.Current.SetControllerFactory(controllerFactory);

            container.Register(
                    Classes.FromThisAssembly()
                    .BasedOn(typeof(IController))
                    .If(t => t.Name.EndsWith("Controller"))
                    .If(t => t.Namespace.StartsWith("ControllerInjection.Controllers"))
                    .Configure(c => c.LifestylePerWebRequest()));
        }

        private static void RegisterInjector(WindsorContainer container)
        {
            container.Register(
                Component.For<IWindsorContainer>()
                .Instance(container));
        }
    }
}

This is very similar to the injector in my basic dependency example, apart from the addition of a method to register controllers. Crucially, this method also registers our customer controller factory. Note that the lifestyle of each controller is set using LifestylePerWebRequest. This ensures that each new request gets its own controller instance.

As the controller factory is only registered once the injector singleton instance has been instantiated, we need to make sure that we initialise the injector when the application starts up. I’ve done this in the Application_Start method of the Global.asax class:

using System.Web.Http;
using System.Web.Mvc;
using System.Web.Routing;
using ControllerInjection.DependencyInjection;

namespace ControllerInjection
{
    public class MvcApplication : System.Web.HttpApplication
    {
        protected void Application_Start()
        {
            // Ensure the dependency injection has been initalised:
            var injector = Injector.Instance;

            /* Normally you would do something with the injector here, like writing an entry to 
             * the log stating that the application had started. */

            AreaRegistration.RegisterAllAreas();

            WebApiConfig.Register(GlobalConfiguration.Configuration);
            FilterConfig.RegisterGlobalFilters(GlobalFilters.Filters);
            RouteConfig.RegisterRoutes(RouteTable.Routes);
        }
    }
}

In practice this doesn’t prove to be a problem as most applications will involve some kind of logging tool (such as Log4Net) which will be obtained from the dependency injection engine. It is usual to log the fact that the application starts, so the injector gets instantiated anyway.

Running the code results in the following string being written to the screen as expected:

The current time on the server is: 11/04/2013 21:59:36

Basic dependency injection with Castle Windsor

I’ve already blogged about dependency injection using Castle Windsor in a previous article:

Registering many like types in Castle Windsor

…without giving any of the details around how to set up dependency injection in the first place. This post aims to put that right by demonstrating a basic “Hello World” for those new to dependency injection with Castle Windsor. My example application will simply write the current date and time to the screen using a console application.

I’ve created a solution called BasicDependencyInjection and added a console application with the same name. Don’t forget to change the client profile in your console application as described in a previous post.

I’ve used NuGet to add Castle Windsor to the console application.

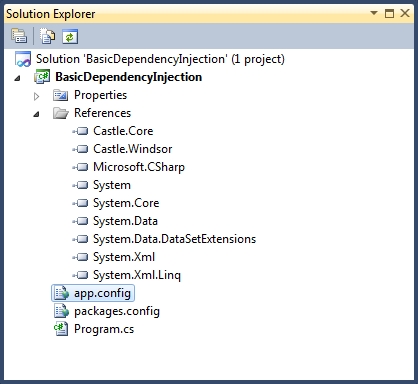
My starting solution now looks like this:

Basic DI 01

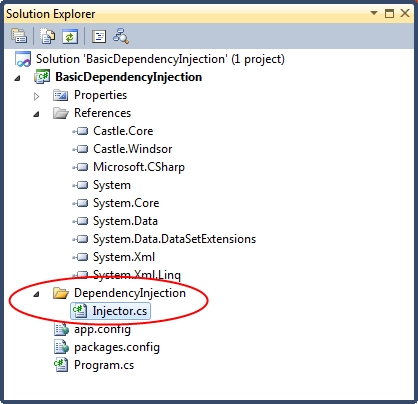
To this I’ve added a class called Injector in a folder called DependencyInjection:

Basic DI 02

The code in this file is as follows:

using Castle.Windsor;
using Castle.Windsor.Installer;
using Castle.MicroKernel.Registration;

namespace BasicDependencyInjection.DependencyInjection
{
    public static class Injector
    {
        private static readonly object InstanceLock = new object();

        private static IWindsorContainer instance;

        public static IWindsorContainer Instance
        {
            get
            {
                lock (InstanceLock)
                {
                    return instance ?? (instance = GetInjector());
                }
            }
        }

        private static IWindsorContainer GetInjector()
        {
            var container = new WindsorContainer();

            container.Install(FromAssembly.This());

            RegisterInjector(container);

            /* Register more components here */
            
            return container;
        }
        
        private static void RegisterInjector(WindsorContainer container)
        {
            container.Register(
                Component.For<IWindsorContainer>()
                .Instance(container));
        }
    }
}

This is using a take on the singleton pattern to ensure there can only ever be one injector in the application. Note that the class also uses simple thread-locking to ensure that the singleton pattern isn’t bypassed by multiple threads requesting an instance at the same time.

Aside: These days the singleton pattern is considered bad practice. I believe the reason for this is that anything that would traditionally have been created using this pattern should now be injected. However, there is no way to “inject the injector” so I think use of the singleton pattern for this specific task is acceptible. I’d be interested to hear other opinions on this.

At the moment the only thing the injector can resolve is itself. We’ll add to the injector later on in the example. Next we need to create some test dependencies to inject.

When doing demonstrations using dependency injection I like to involve the current date and time as this is a classic textbook example of a dependency, and one that is often overlooked. If you’re hardcoding DateTime.Now statements throughout your code you haven’t removed all your dependencies! Other than making code loosely coupled one of the main advantages of dependency injection is that code is more testable. If you hardcode DateTime.Now you make unit testing much harder as test data needs to be generated each time to reflect the date on which the tests are being ran.

For dependency injection to work we need a class and an interface for each dependency, so I’m going to add Watch and IWatch to the application as follows:

Basic DI 03

These contain the following simple code:

using System;

namespace BasicDependencyInjection
{
    public interface IWatch
    {
        DateTime GetTime();
    }
}
using System;

namespace BasicDependencyInjection
{
    public class Watch : IWatch
    {
        public DateTime GetTime()
        {
            return DateTime.Now;
        }
    }
}

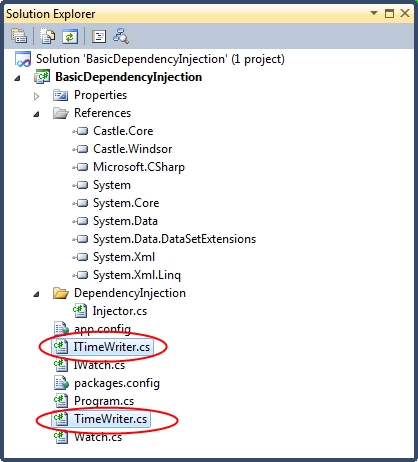
I’m also going to include a dependency to actually write the date and time to the screen, using ITimeWriter and TimeWriter:

Basic DI 04

…which are as follows:

namespace BasicDependencyInjection
{
    public interface ITimeWriter
    {
        void WriteTime();
    }
}
using System;

namespace BasicDependencyInjection
{
    public class TimeWriter : ITimeWriter
    {
        public IWatch Watch { get; set; }

        public void WriteTime()
        {
            Console.WriteLine("The current time is: {0}", Watch.GetTime());
        }
    }
}

The TimeWriter class has a property of Type IWatch called Watch, which doesn’t appear to be assigned a value anywhere in the code. One of the most confusing things for developers new to dependency injection is where these properties actually get set. When debugging through existing codebases with dependency injection enabled properties such as these do have values assigned but the assignment cannot be found anywhere. It’s like magic! The thing to remember is that when a reference is resolved using a dependency injecton framework, all contructor arguments and properties that have an interface that the injector knows about are assigned the object associated with the interface.

Now that dependencies have been added, we need to make sure the injector knows about them. I’ve updated the injector class as follows:

using Castle.Windsor;
using Castle.Windsor.Installer;
using Castle.MicroKernel.Registration;

namespace BasicDependencyInjection.DependencyInjection
{
    public static class Injector
    {
        private static readonly object InstanceLock = new object();

        private static IWindsorContainer instance;

        public static IWindsorContainer Instance
        {
            get
            {
                lock (InstanceLock)
                {
                    return instance ?? (instance = GetInjector());
                }
            }
        }

        private static IWindsorContainer GetInjector()
        {
            var container = new WindsorContainer();

            container.Install(FromAssembly.This());

            RegisterInjector(container);
            RegisterTimeComponents(container);
            
            return container;
        }
        
        private static void RegisterTimeComponents(WindsorContainer container)
        {
            container.Register(
                   Component.For()
                   .ImplementedBy(typeof(Watch))
                   .LifeStyle.Singleton);

            container.Register(
                   Component.For()
                   .ImplementedBy(typeof(TimeWriter))
                   .LifeStyle.Singleton);
        }

        private static void RegisterInjector(WindsorContainer container)
        {
            container.Register(
                Component.For<IWindsorContainer>()
                .Instance(container));
        }
    }
}

This now maps IWatch to Watch and ITimeWriter to TimeWriter.

All that remains is to include some code in the program:

using System;
using BasicDependencyInjection.DependencyInjection;

namespace BasicDependencyInjection
{
    public static class Program
    {
        public static void Main()
        {
            var timePrinter = Injector.Instance.Resolve();
            timePrinter.WriteTime();

            Console.WriteLine();
            Console.WriteLine("Press RETURN to exit...");
            Console.ReadLine();
        }
    }
}

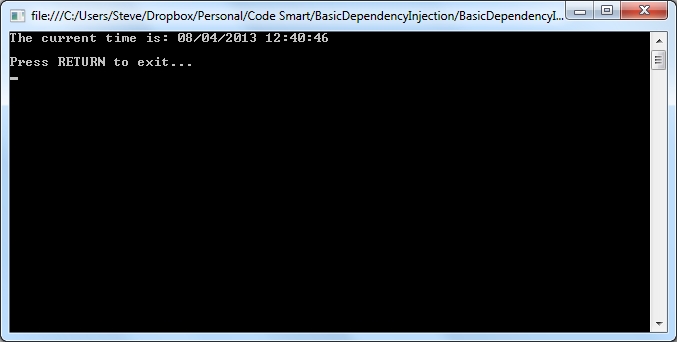
…and run the thing. Which yields:

Basic DI 05

…as expected.

That concludes my dependency injection “Hello World”.

Simple AJAX ASP.NET MVC web-pages that work without JavaScript

AJAX, .NET 4, MVC etc… work together to make web-development very simple, and when Microsoft introduced @Ajax.BeginForm(…) it looked as though life couldn’t get any easier. However, now that jQuery is integrated into Visual Studio as well, I think there are better ways of building AJAX enabled web-pages that using Microsoft’s take on AJAX.

In this post I’ll be building an example solution that is AJAX enabled using jQuery, but works fine if the user has JavaScript switched off. (Although I’m not sure how many people that is this days. In 2010 some say it was around 2% of users but probably less now, although there are still going to be users with a valid reason why they need to keep it disabled.)

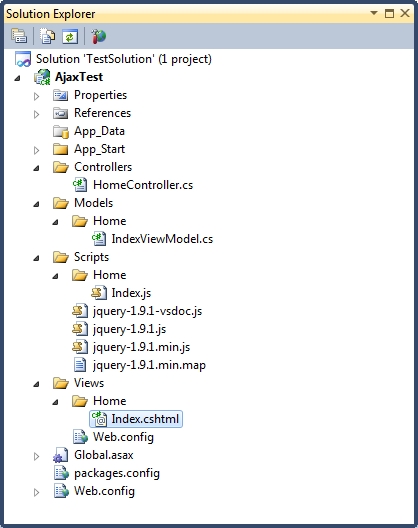
So, the final solution is going to look like this:

Simple Ajax 1

I started with an empty MVC 4 project in Visual Studio 2010 and added references to jQuery using the awesome NuGet.

IndexViewModel in the AjaxTest.Models.Home namespace looks like this:

namespace AjaxTest.Models.Home
{
    public class IndexViewModel
    {
        public string Value { get; set; }
    }
}

…it’s just a simple POCO with a single field. The Index.js file in the folder Scripts\Home\Index.js looks like this:

$(function () {
    $('form').submit(function () {
        $.ajax({
            url: this.action,
            type: this.method,
            data: $(this).serialize(),
            success: function (result) {
                $('#Target').html(result);
            }
        });
        return false;
    });
});

This looks for a form element and wires up an AJAX call in to the form submit event using jQuery. When the AJAX call completes, any data received is written to a div called Target. If this was anything other than a simple demonstration I would handle errors with a suitable pop-up. The ‘return false;’ statement at the end is really important. This tells JavaScript not to allow the form submit event to bubble up as normal when the code declared here completes.

Next is the Index.cshtml file, which is the display part of the application:

@model AjaxTest.Models.Home.IndexViewModel
@{
    Layout = null;
}
<!DOCTYPE html>
<html>
<head>
    <meta name="viewport" content="width=device-width" />
    <script language="javascript" type="text/javascript" src="@Url.Content("~/Scripts/jquery-1.9.1.js")"></script>
    <script language="javascript" type="text/javascript" src="@Url.Content("~/Scripts/Home/Index.js")"></script>    
    <title>Index</title>
</head>
<body>
    <div>
        @using (Html.BeginForm("Index", "Home"))
        {
            <div><input type="submit" value="Click to Update" /></div>
            <div id="Target">@Model.Value</div>
        }
    </div>
</body>
</html>

References to both jQuery and my own JavaScript file have been added, along with a model declaration. Inside the body tag is a normal HTML form, a submit button and the div that will be targetted by my AJAX call.

Finally, here is the code for the controller that binds everything together:

using System.Web.Mvc;
using AjaxTest.Models.Home;
using System;

namespace AjaxTest.Controllers
{
    public class HomeController : Controller
    {
        public ActionResult Index()
        {
            var viewModel = new IndexViewModel { Value = "No Value" };
            return View("Index", viewModel);
        }

        [HttpPost]
        public ActionResult Index(object formData)
        {
            var newValue = "Value: " + DateTime.Now;

            // Use an AJAX dialog if possible:
            if (Request.IsAjaxRequest())
            {
                return Content(newValue);
            }

            return View("Index", new IndexViewModel { Value = newValue });
        }
    }
}

The Get method creates a view model for the initial state of the page and renders our index page. The Post method is a little more interesting. This uses the Request.IsAjaxRequest() to determine whether the Post was performed using AJAX or good-old postbacks. If the former is true, some text (containing the time) is returned which our JavaScript function will insert into the div named Target. If not, the entire form is returned, still using the text that would have been passed back had JavaScript been enabled in the client browser.

The end result that the user receives is the same regardless of whether they have JavaScript enabled or not, but in cases where they do, a postback is avoided.

Thank you jQuery!